#eggs

Asparagus Nests

Asparagus Nests

This one-pan meal can be pulled together in just 12 minutes and requires only 8 ingredients, including salt, pepper and oil. I’ve fed it to my family for brunch, lunch and dinner, and they asked for more for breakfast the next day. Round out the meal with a side of creamy polenta or grits. Or serve it over a bed of chewy farro or wheat berries. If you can spare the extra mostly hands-free cooking time, my favorite accompaniment to this, however, is Rosemary Roasted Potatoes.

Use Your Eggs

photo by Miguel Andrade

For about 2 years, a PSA plastered to the bus stop on my corner got me to eat my eggs. From the poster, I learned: it takes 53 gallons of water to produce a single egg. That’s right, 53 gallons for 1 egg. It’s staggering. Would you dump out 53 gallons of water for no reason? So don’t waste those eggs, okay? For all their uses, and due to their lengthy fridge shelf life, it’s unlikely that we will squander a whole untouched egg, unless broken accidentally (see more about that below). The challenge is utilizing separated yolks or whites when one or the other is called for in a recipe.

Below, I’ve compiled my favorite ways to use either extra whites or extra yolks, always within a few days of separating them. I’ve linked to my own recipes where available on my blog, and will add to this as more are published. Reach out for recipes not yet added to my website. I’m happy to pass along.

Please share you own ideas for using eggstra whites or yolks or even partially used whole eggs in the comments section below.

Eggstra Whites? Make…

  • Meringue - the cookies, the pie topping, the Swiss buttercream

  • Pavlova - basically, a giant meringue

  • Marshmallows and Marshmallow topping  - get me s’more, baby!

  • Fortune cookies - press your luck with the quick folding technique

  • Macaroons and Macarons - yolkless is something these closely named cookies have in common. Or try Mandelhoernchen, an almond version of meringue cookies.

  • Matzo Balls - no yolks needed

  • Angel food cake - like the cloud she floats on

  • Candied Nuts - this one blew me away

  • Even Crunchier Granola - optional, for when you have an extra white lying around

  • Cocktails - like the Pisco Sour or Gin Fizz

  • Meatball, Veggie Patty or Dumpling Filling - just holding it all together

  • Souffle - chocolate is great, but have you tried cheese?

  • Add to any situation when using scrambled eggs to make it lighter or add protein

Eggstra Yolks? Make…

  • Caesar dressing

  • Hollandaise, Bernaise, Mayonnaise, or basically anything ending in aise? or Aioli

  • Pasta - add extra eggs to the dough or get fancy and fill raviolo with an egg yolk

  • Challah or enriched breads

  • Custard, Creme brulee, or Pot de creme

  • Zabaglione or pastry cream

  • Pasta Carbonara

  • Bread Pudding or French Toast

  • Tiramisu

  • Duchess Potatoes - did you know there was an even better way to enjoy mashed potatoes?

  • Ice cream - extra yolks are as good excuse as any to make ice cream

  • Curd - lemon, lime, passion fruit, any fruit

  • Eggnog

  • Short Crust Pastry

  • Egg yolk soup- like Chinese egg drop or Greek Avgolemono (lemon rice soup)

  • Add to any situation when using scrambled eggs to make it richer or add fat


Sparing Whole Eggs:

If an egg does accidentally crack or even break, all hope is not lost. If you saw it happen, and it was less than an hour or so, pick out the shell and transfer that cracked egg to an airtight container. Keep it refrigerated until you can use it, or within a few days. Don’t worry about any bacteria it might have picked up on the countertop or from outside its shell when it broke. Any harmful bacteria would already be on the inside anyway and needs to get cooked thoroughly before you eat it.

Same goes for if you are separating eggs and yolk bleeds into whites or vice versa — just transfer to an airtight container and make a mental note to use it first the next time you need a whole egg.

Same goes for a beaten egg from an egg wash. If you have a bit remaining, add it to your next batch of scrambled eggs, french toast batter, or meatball mixture. Or just pop it in the microwave for 15 seconds with salt and pepper and have a protein rich snack while you bake.

Dyeing Eggs with Natural Colors

t59nzEM5SgyLWcWlti313Q.jpg

I first started exploring natural food dyes when trying to decorate my son’s birthday cake without using artificial colors from a little squeeze bottle. I knew there had to be ways to get vibrant colors out of actual foods. After discovering how to make pink, blue, green and yellow frosting, I moved on to coloring pasta, which is by far the most forgiving medium for natural food coloring. One can easily adjust moisture levels in pasta dough, which absorbs colors from solids, pastes, liquids and powders. Eggs, which are dyed in a quick bath of a colorful liquid, posed a new set of challenges.

Since we dunk eggs into liquid dyes, the pigments from colorful foods need to be transferred as much as possible to the water they are cooked in before straining off solids like shredded beets or dried flowers. And ground spice powders, like turmeric and paprika would ideally dissolve into the liquid. Not the case. Many formulas for natural dyes will tell you to use powdered turmeric for yellow. I love spices and figured I’d try others too like paprika, sumac, & chili powder. Why not?

Left: Speckled orange egg created with ground turmeric, ground paprika and oil based dye. Right: Blue polka dot egg created with butterfly pea flower dye and stickers.

Left: Speckled orange egg created with ground turmeric, ground paprika and oil based dye. Right: Blue polka dot egg created with butterfly pea flower dye and stickers.

It’s challenging to get clear vibrant color from these ground spices. First, ground spices are fat soluble, which means they work better with oil to break down and disperse their colors. But dunking an egg in oil sounded unorthodox and messy. So I followed the advice and simply simmered ground spices in boiling water for 20 minutes & then strained. The color was there, but it required a multi-hour, if not an overnight soak to dye eggs, and it left a little grit on the eggs, no matter how fine the strainer. So I revisited spices 101 and decided to bloom them first (or sauté them in a little bit of oil) before adding some water to make the liquid dye. The colors were certainly more vibrant and adhered in under 20 minutes, but the oil left a splotched rather than smooth finish on the egg - check out the orange speckled egg made from a combination of paprika and turmeric. Up next, I will attempt a dye made 100% from the ground spices bloomed in oil.

Fresh turmeric root. Grated.

Fresh turmeric root. Grated.

So, how do you get the best clear liquid yellow dye? If you have it available, fresh grated turmeric root works best. I simmered it in water just like the other fresh vegetables, and then strained off the solids. While the turmeric root itself appears orange, the liquid it creates makes a beautiful soft and natural yellow. If fresh turmeric root is not available, shredded golden beets work as well.

Top left: blue butterfly pea flower dye; Top right: yellow turmeric root dye; Bottom: Green dye made from combining

Top left: blue butterfly pea flower dye; Top right: yellow turmeric root dye; Bottom: Green dye made from combining

I had such success adding greens of all shades and varieties — sautéed, steamed, juiced and blanched spinach, kale, parsley & chard — to pasta dough & frosting that I didn’t expect it to be so challenging to dye eggs green. And, green eggs & ham, right? Wrong. For egg dying, not only do the green colors become terribly diluted in liquid, but the key ingredient required for getting dye to adhere to eggs destroys the green pigments. We add vinegar to egg dyes to create an acidic mixture that reacts with the calcium in the egg shell, allowing colors to be absorbed. While this acid creates vivid blues and bright pinks, any acid (lemon juice, wine, tomato sauce) deteriorates green rapidly and transforms it to an unappetizing olive or brown. The answer? Create vibrant greens by combining yellow and blue dye immediately before dunking eggs.

28AD9733-A57F-411C-9A48-452CB32EB79F.jpg

How to Produce a Rainbow of Natural Dyes

To make most types of natural liquid dye:

  1. Boil or steep vegetables (1 cup), spices (1 tablespoon), or dried flowers or teas (1/2 cup) in water (1 1/2 - 2 cups) for 10-20 minutes.

  2. Strain through a fine mesh strainer. Discard, compost or reuse the solids.

  3. Add vinegar and stir. Use ~1 tablespoon vinegar to 1 cup liquid dye. Use less for acidic mixtures like berries cooked in lemon juice.

Steep: to soak (food, tea, etc.) in hot water so as to extract its flavor or color or to soften or reconstitute it

Boil: to cook (food) in boiling water over a heat source


Recommended formulas

For a quick reference list of formulas for these and a full rainbow of dyes, click here.


General Tips and Hacks for Dying Eggs

Chili Maple Glazed Squash with Runny Eggs

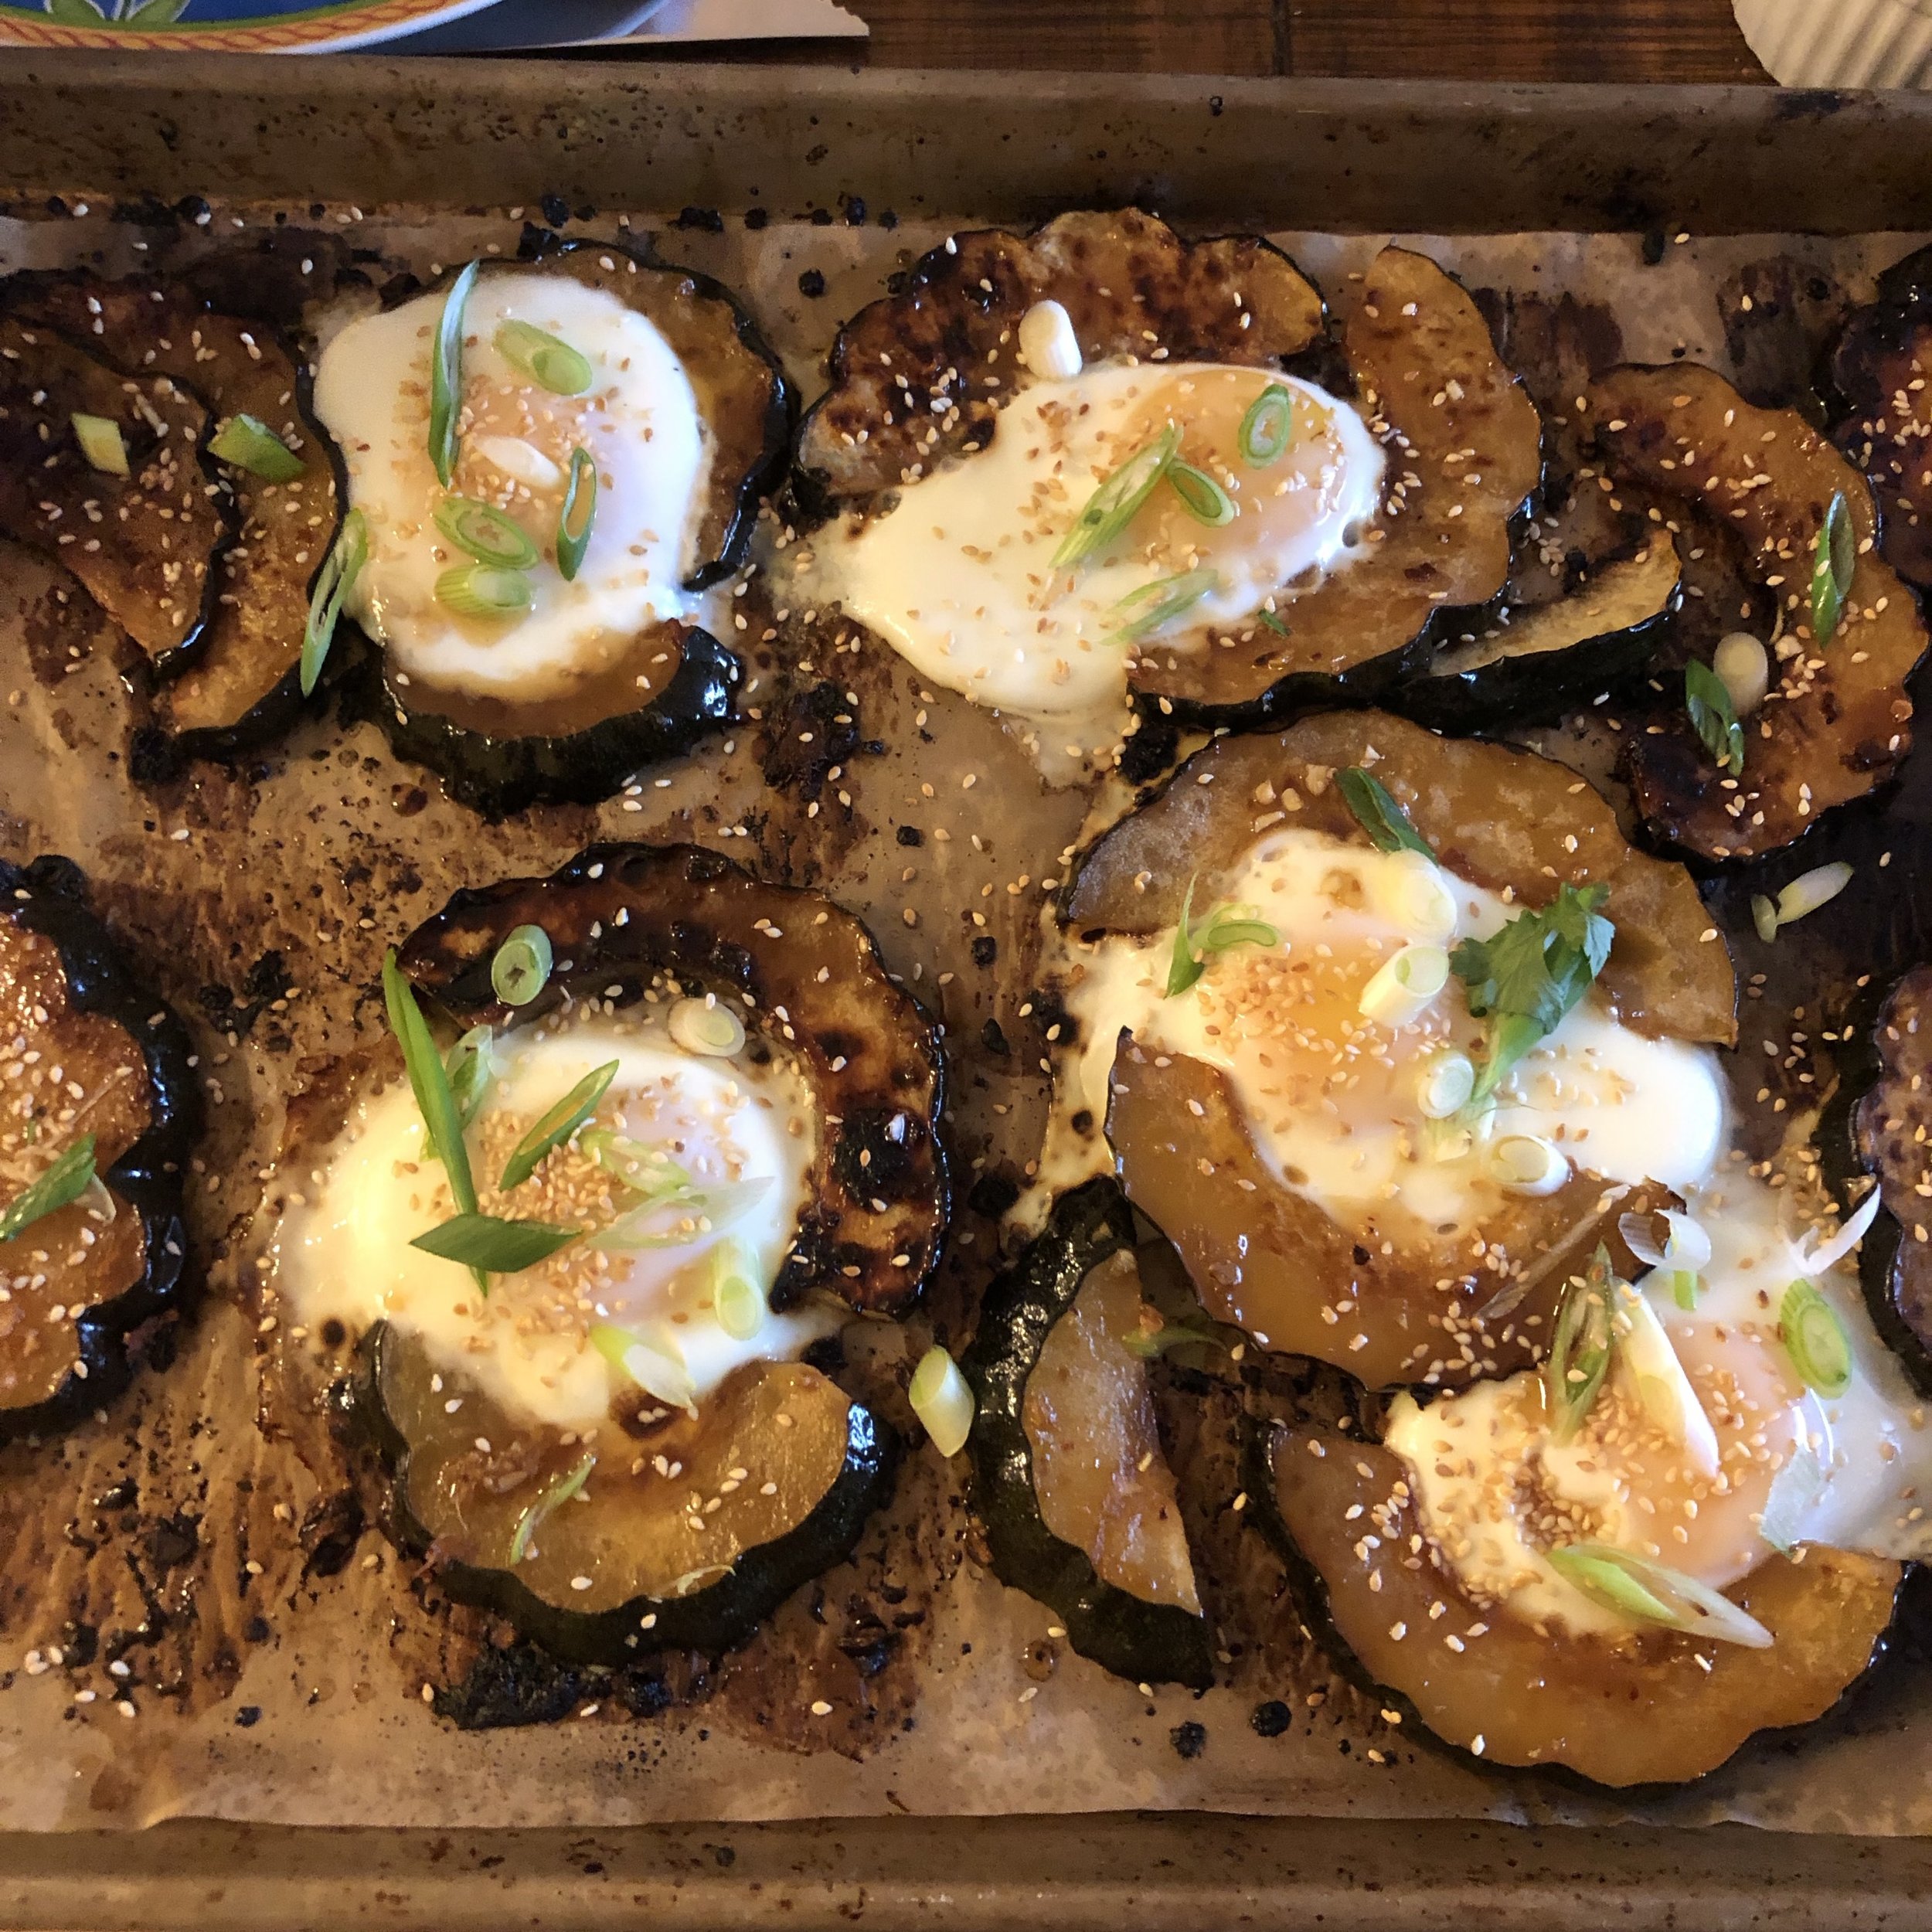
In my classes and conversations with many home cooks and those eager to become home cooks, I hear the same repeated request: Healthy. Easy. Meals. So here’s one of my favorites that meets this criteria and then some. As a sheet pan supper, you’ll only be washing one pan after you stuff your face with wholesome goodness. And since the incredible edible egg is the star protein, equally acceptable for breakfast, lunch and dinner (and of course BRUNCH), it’s easy on the wallet. The chili maple glaze turns the squash into crunchy on the outside, creamy on the inside, candy that even squash resisters can’t stop eating.

You can use any type of squash, but I find delicata or acorn work best in this dish, since the roasted skin is deliciously edible, upping the convenience and health factors (thank you, fiber). If butternut or another variety of squash is more readily available to you, go for it. Whichever you use, cut the squash into symmetrical crescent-shaped slices that can be ingeniously arranged to contain a cracked egg.

Make this for dinner on a weeknight. Make it for brunch and impress your friends. Make extra and put the leftovers inside a taco.

CHILI MAPLE GLAZED SQUASH AND RUNNY EGGS

Serves: 4 as a main dish

Acorn squash cut into crescent shaped slices and tossed in chili maple glaze before roasting.

Acorn squash cut into crescent shaped slices and tossed in chili maple glaze before roasting.

What you need:

  • ¼ cup maple syrup

  • 2 tablespoons sesame oil

  • 1 tablespoon grapeseed oil (or canola)

  • 1 tablespoons apple cider vinegar

  • 1 tablespoon tamari (or shoyu or soy sauce)

  • 4 cloves garlic, peeled, minced or grated

  • 1 inch piece ginger root, peeled, minced or grated

  • ¼ - ½ teaspoon chipotle chili flakes, optional

  • ½ teaspoon kosher salt

  • 1 acorn or 2 delicata squash, about 2 pounds

  • 8 eggs

  • 2-3 scallions, sliced at an angle

  • 2 teaspoons sesame seeds, toasted

Delicata squash after roasting, ready to get brushed with more glaze, and arranged for the eggs to get cracked on top.

Delicata squash after roasting, ready to get brushed with more glaze, and arranged for the eggs to get cracked on top.

Garnish with sesame seeds, sliced scallions and more glaze.

Garnish with sesame seeds, sliced scallions and more glaze.

What you do:

  1. Preheat the oven to 400 degrees and line a baking sheet with parchment paper.

  2. Cut the squash in half lengthwise. Scoop out the seeds. Slice into ½ inch-thick crescent shaped slices. (Peeling delicata or acorn squash is optional.)

  3. In a large bowl, whisk together the maple syrup, sesame oil, grapeseed oil, apple cider vinegar, tamari, garlic, ginger, and chipotle chili flakes.

  4. Season the squash pieces with salt and add to the maple syrup mixture. Toss to coat. Set aside for 10 minutes.

  5. Spread the squash in a single layer on the parchment lined sheet tray, reserving the extra glaze. Bake 25-30 minutes or until it is golden brown on the underside.

  6. Remove the pan from the oven, flip the squash, brush with additional glaze and return the pan to the oven. Bake another 10-15 minutes or until squash is browned on both sides.

  7. Arrange the squash so that two half moons create a circle with a well in the middle. Drop one egg into each well. Season with salt. Return the pan to the oven and bake 7-8 minutes or until whites are solid and yolks are cooked to your preference.

  8. Garnish with toasted sesame seeds, scallion slices and more chili maple glaze. Serve immediately.

Perfect Soft Boiled Eggs

There's no mistake. Poached eggs are heavenly. Who doesn't love lazily rolling out of bed on a Sunday and strolling to brunch for a hash or hollandaise-smothered dish with a perfectly runny, bright yellow poached egg on top? But soft boiled eggs are so much more... practical. And I appreciate the practical. While poached eggs are cooked one at time in a carefully watched barely simmering pot of water, soft boiled eggs can be made by the dozen, left bubbling away on the stove, monitored by a timer, cooled, and stored for a week's worth of breakfasts on the go. If you're hosting brunch, this is a smarter option for advanced preparation. And those soft boiled eggs are easily transported as compared to their delicate poached cousins.

What you do:

For soft boiled perfection every time, follow these 6 simple steps. All you need to remember is 6 minutes. Do this just once a week for daily enjoyment.

Tip: To prevent cracking and ensure consistently cooked eggs, use room temperature eggs.

IMG_4881.JPG

Peel and enjoy soft boiled eggs immediately on your favorite benedict, with a toasted bagel or over a hash like my Spicy Root Vegetable and Sausage Hash (pictured below). Store any remaining soft boiled eggs in their shells in the fridge (this makes them sturdier and prevents breaking when transporting in your lunch box). Make at least a half dozen at once so you have soft boiled eggs to add to kale salad, caesar dressing, roasted veggies, and avocado toast throughout the week.