#glutenfreedessert

Almond Cookie Butter and Jam Cups in a Dark Chocolate Shell

IMG_1029.jpg

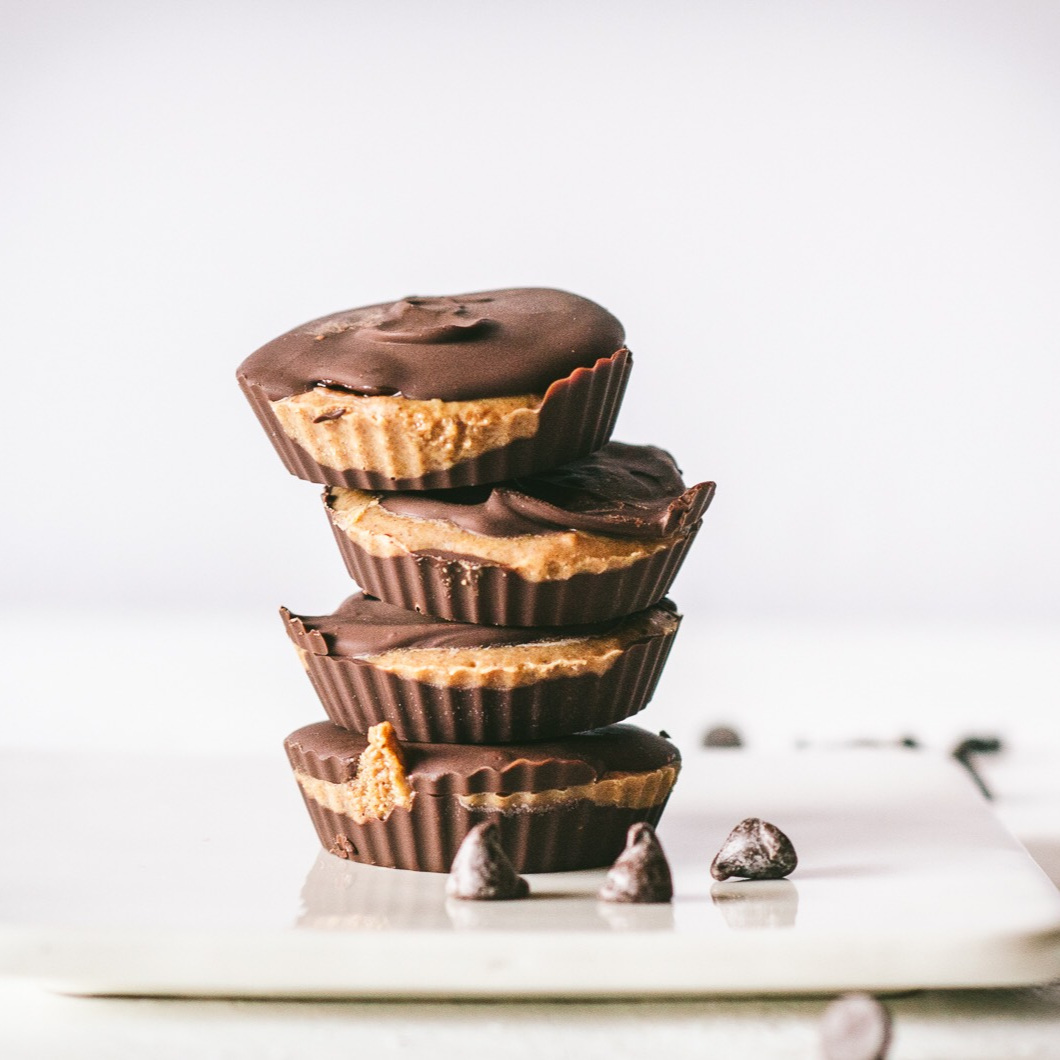
Once, when diligently cleaning out my pantry, I stumbled upon a partial package of biscuits and the dried up remnants of a jar of almond butter (you know, the part left behind because I didn’t bother to evenly distribute the oils). And of course I had dark chocolate chips on hand. Determined to turn these scraps into something edible and pacify my junk candy craving, I whipped up confections suitable for a vacation-land ice cream shop, that can live in my freezer to be eaten on demand.

This recipe has gone through a few iterations to reach the perfect state it’s currently in. At first, I used mini tart shells and swirled the chocolate and almond butter filling together. While it created an artful design (see photo top right), it was much too large for one serving and too hard to cut into for sharing. My initial peanut butter cup inspiration did not include jam. But the richness of the almond butter and the bitterness of the chocolate called for something tart and sweet. Enter in: any type of jam you have on hand - my favorites for this are raspberry and strawberry. Finally, it was the students in my gluten free desserts class who suggested lining the sides of the muffin cup with a thin layer of chocolate to contain all of that almond butter gooeyness (see photo bottom right for earlier less refined yet photogenic version). Proof that even the best desserts can be made better.


Almond Cookie Butter and Jam Cups in a Dark Chocolate Shell

Makes: 9-12 candy pieces

What You Need:

  • 5 teaspoons coconut oil, divided

  • ½ cup plus 2 tablespoons finely crushed biscuit* crumbs

  • ½ cup creamy almond butter

  • Pinch sea salt

  • 8 oz dark chocolate

  • ¼ cup jam (raspberry or strawberry recommended)

What You Do:

  1. Line a small baking sheet with silicone muffin cups or mini tart shells (1½ - 2 inches in diameter).

  2. Over a double boiler (or in a glass bowl in the microwave), melt the coconut oil. Set aside 2 level teaspoons of coconut oil to be added to the chocolate later.

  3. Combine 2 teaspoons melted coconut oil, biscuit crumbs, almond butter and salt in the bowl of a food processor. Process until smooth. Add 1 teaspoon more coconut oil if needed to smooth out the mixture.

  4. In the same double boiler or bowl in which you melted the coconut oil, melt the chocolate with the reserved 2 teaspoons of coconut oil. Whisk until smooth.

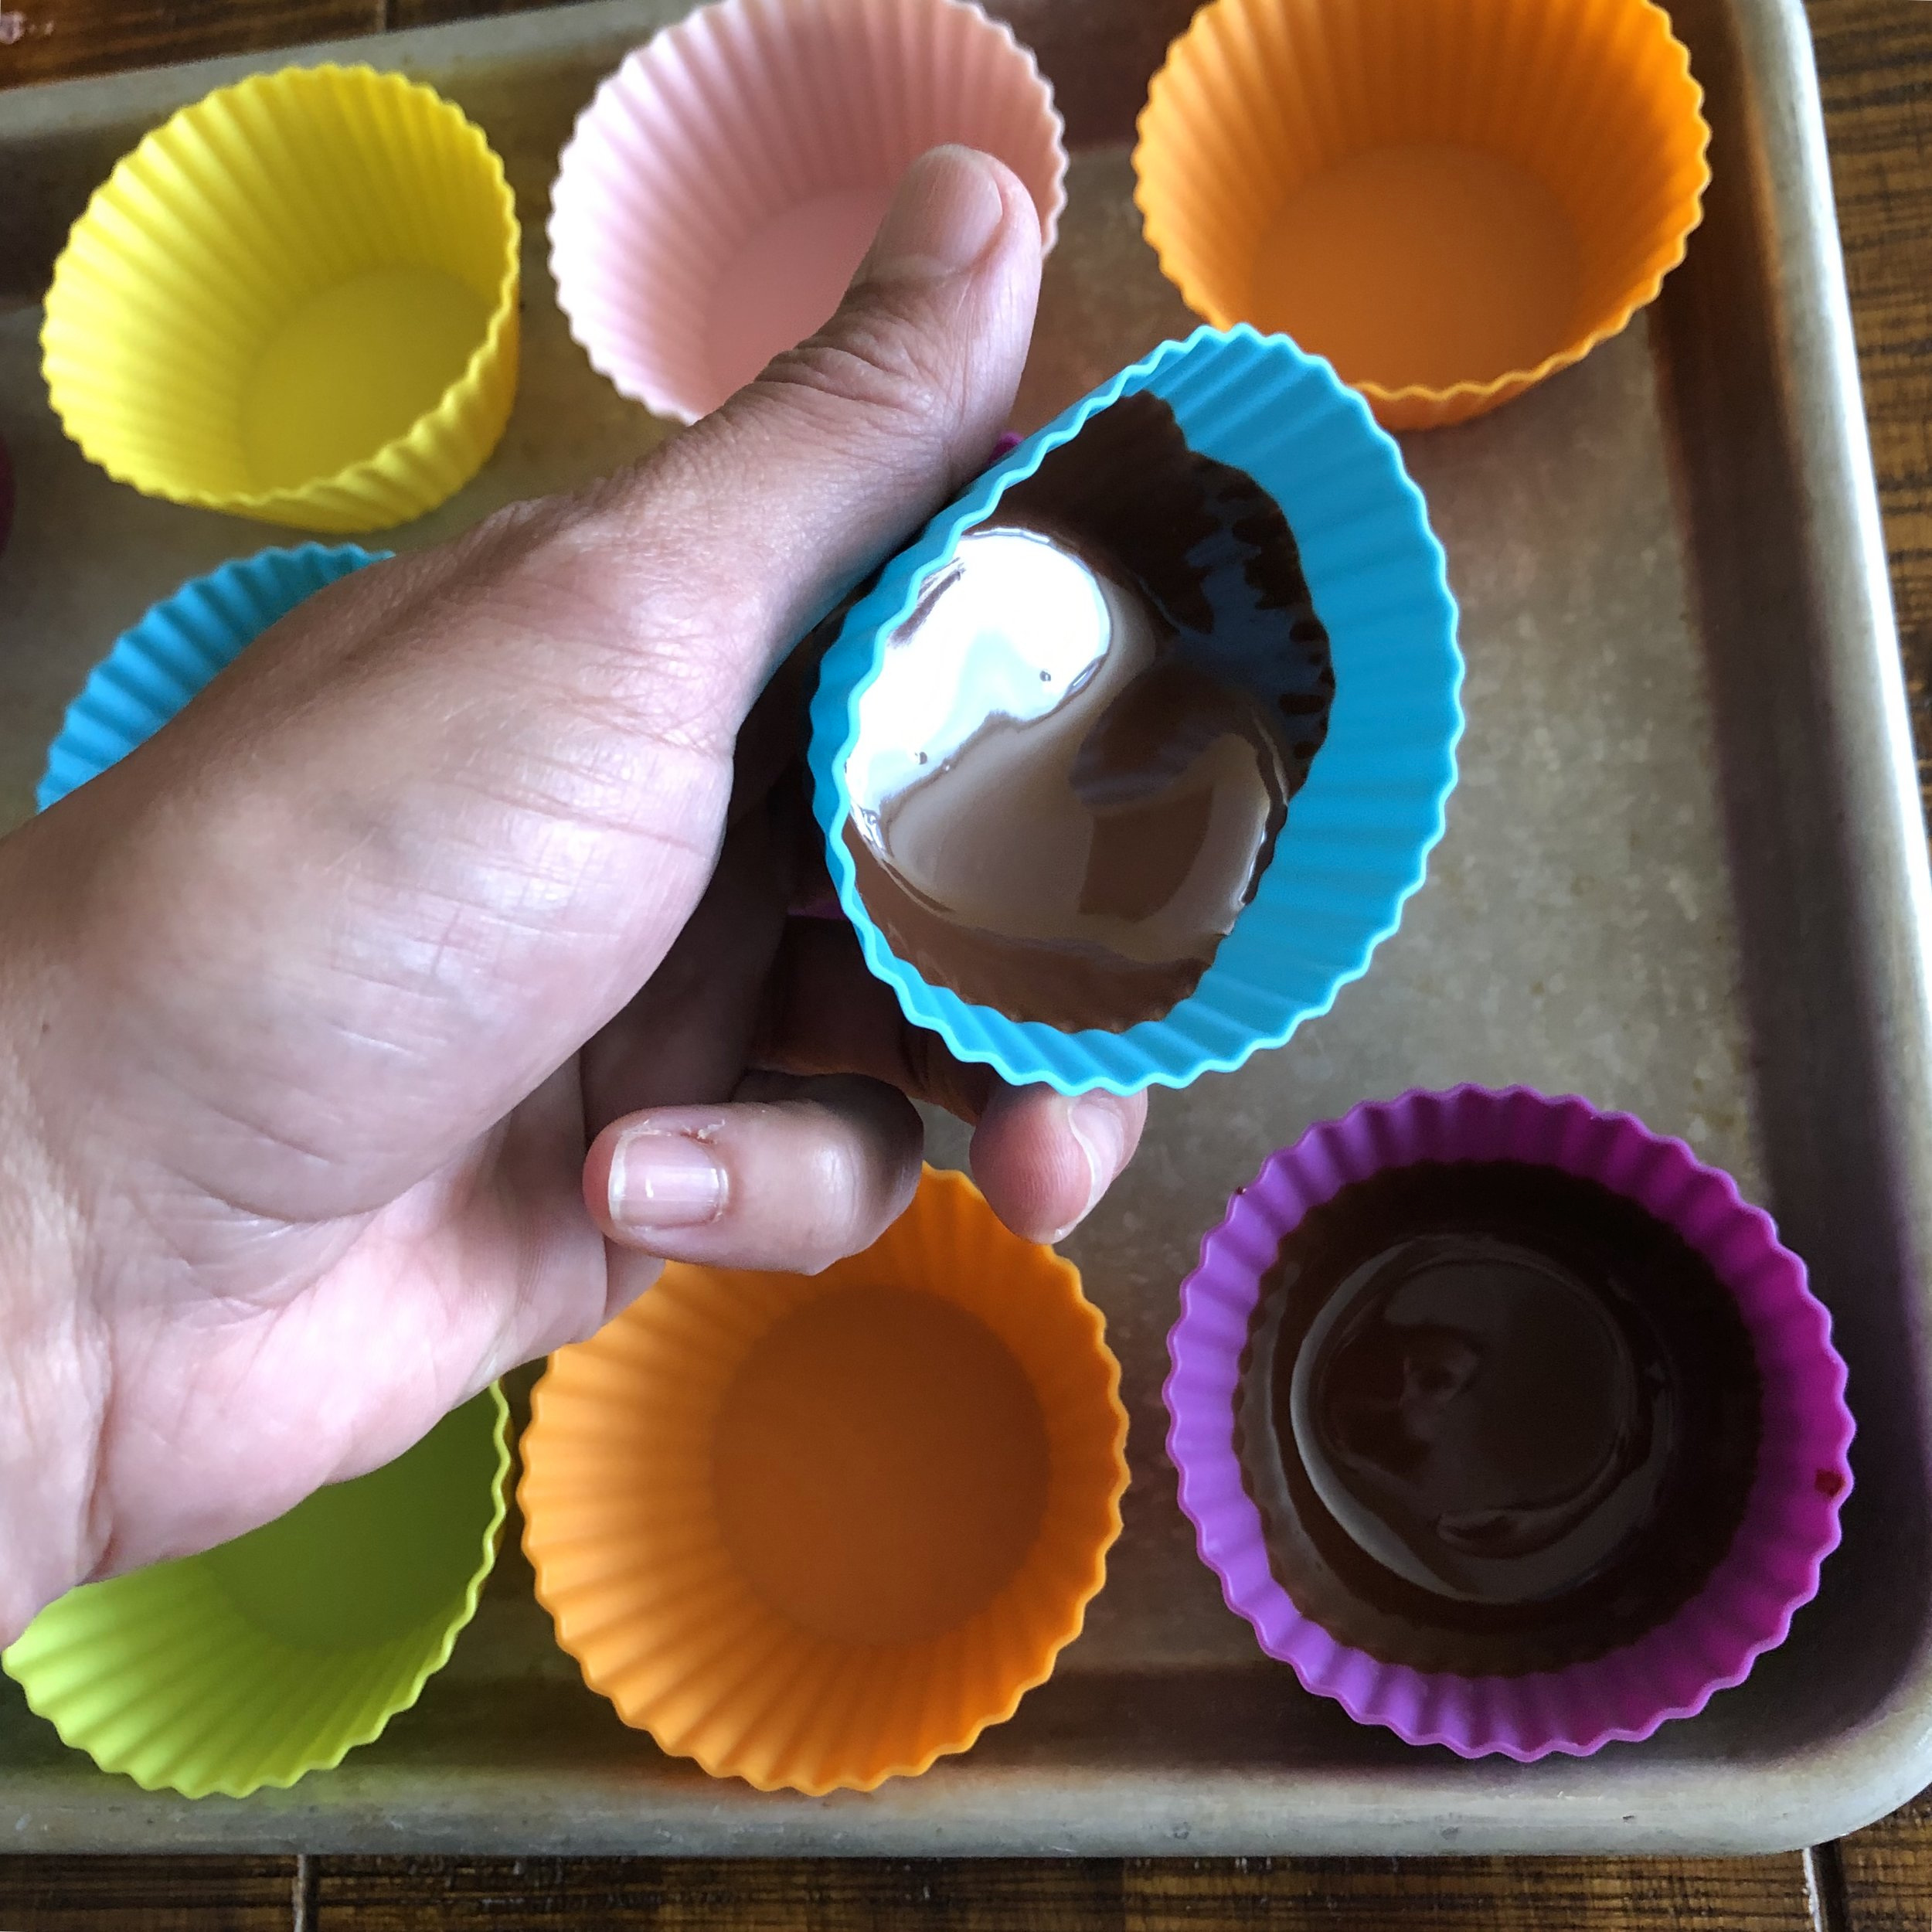
  5. Drop about 1 tablespoon of the melted chocolate into the bottom of each cup and spread out, turning and tilting the cup so that the chocolate evenly coats the bottom of the cup and runs up the sides about half an inch. Freeze for 3-5 minutes.

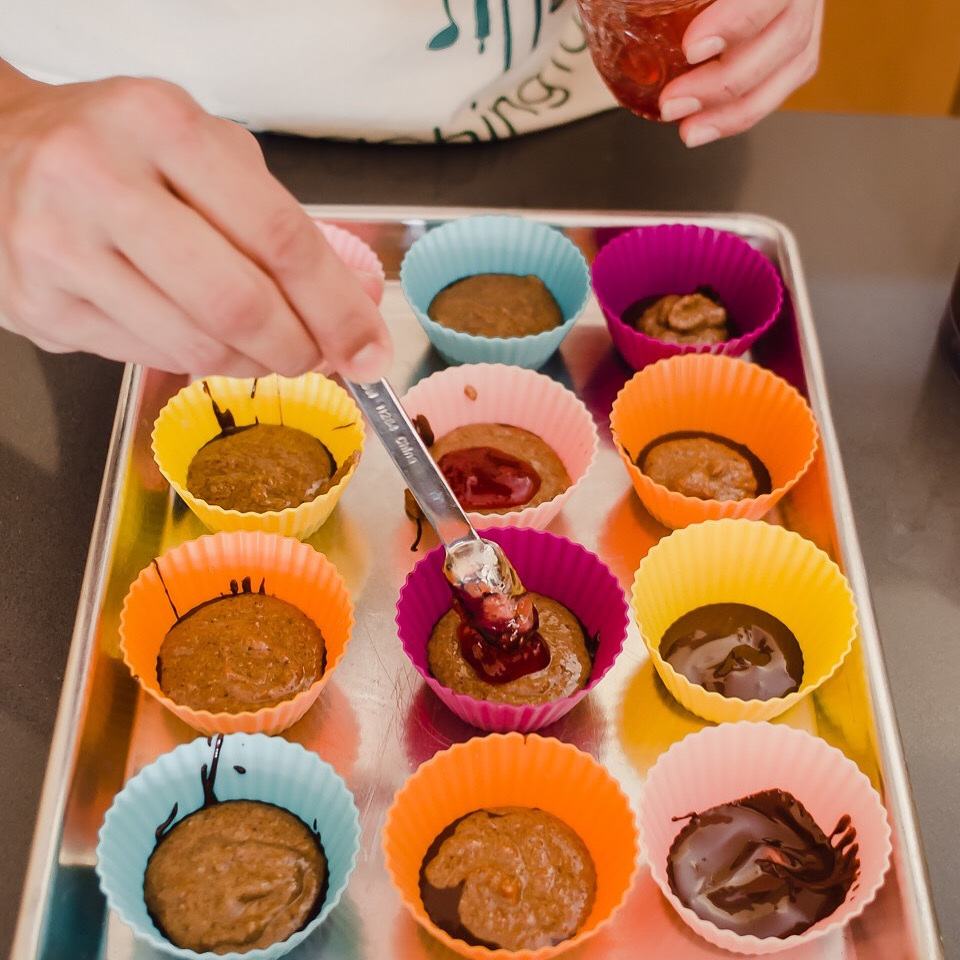
  6. Dollop approximately 1 tablespoon of the biscuit crumb and almond butter mixture on top of the chocolate base in each cup.

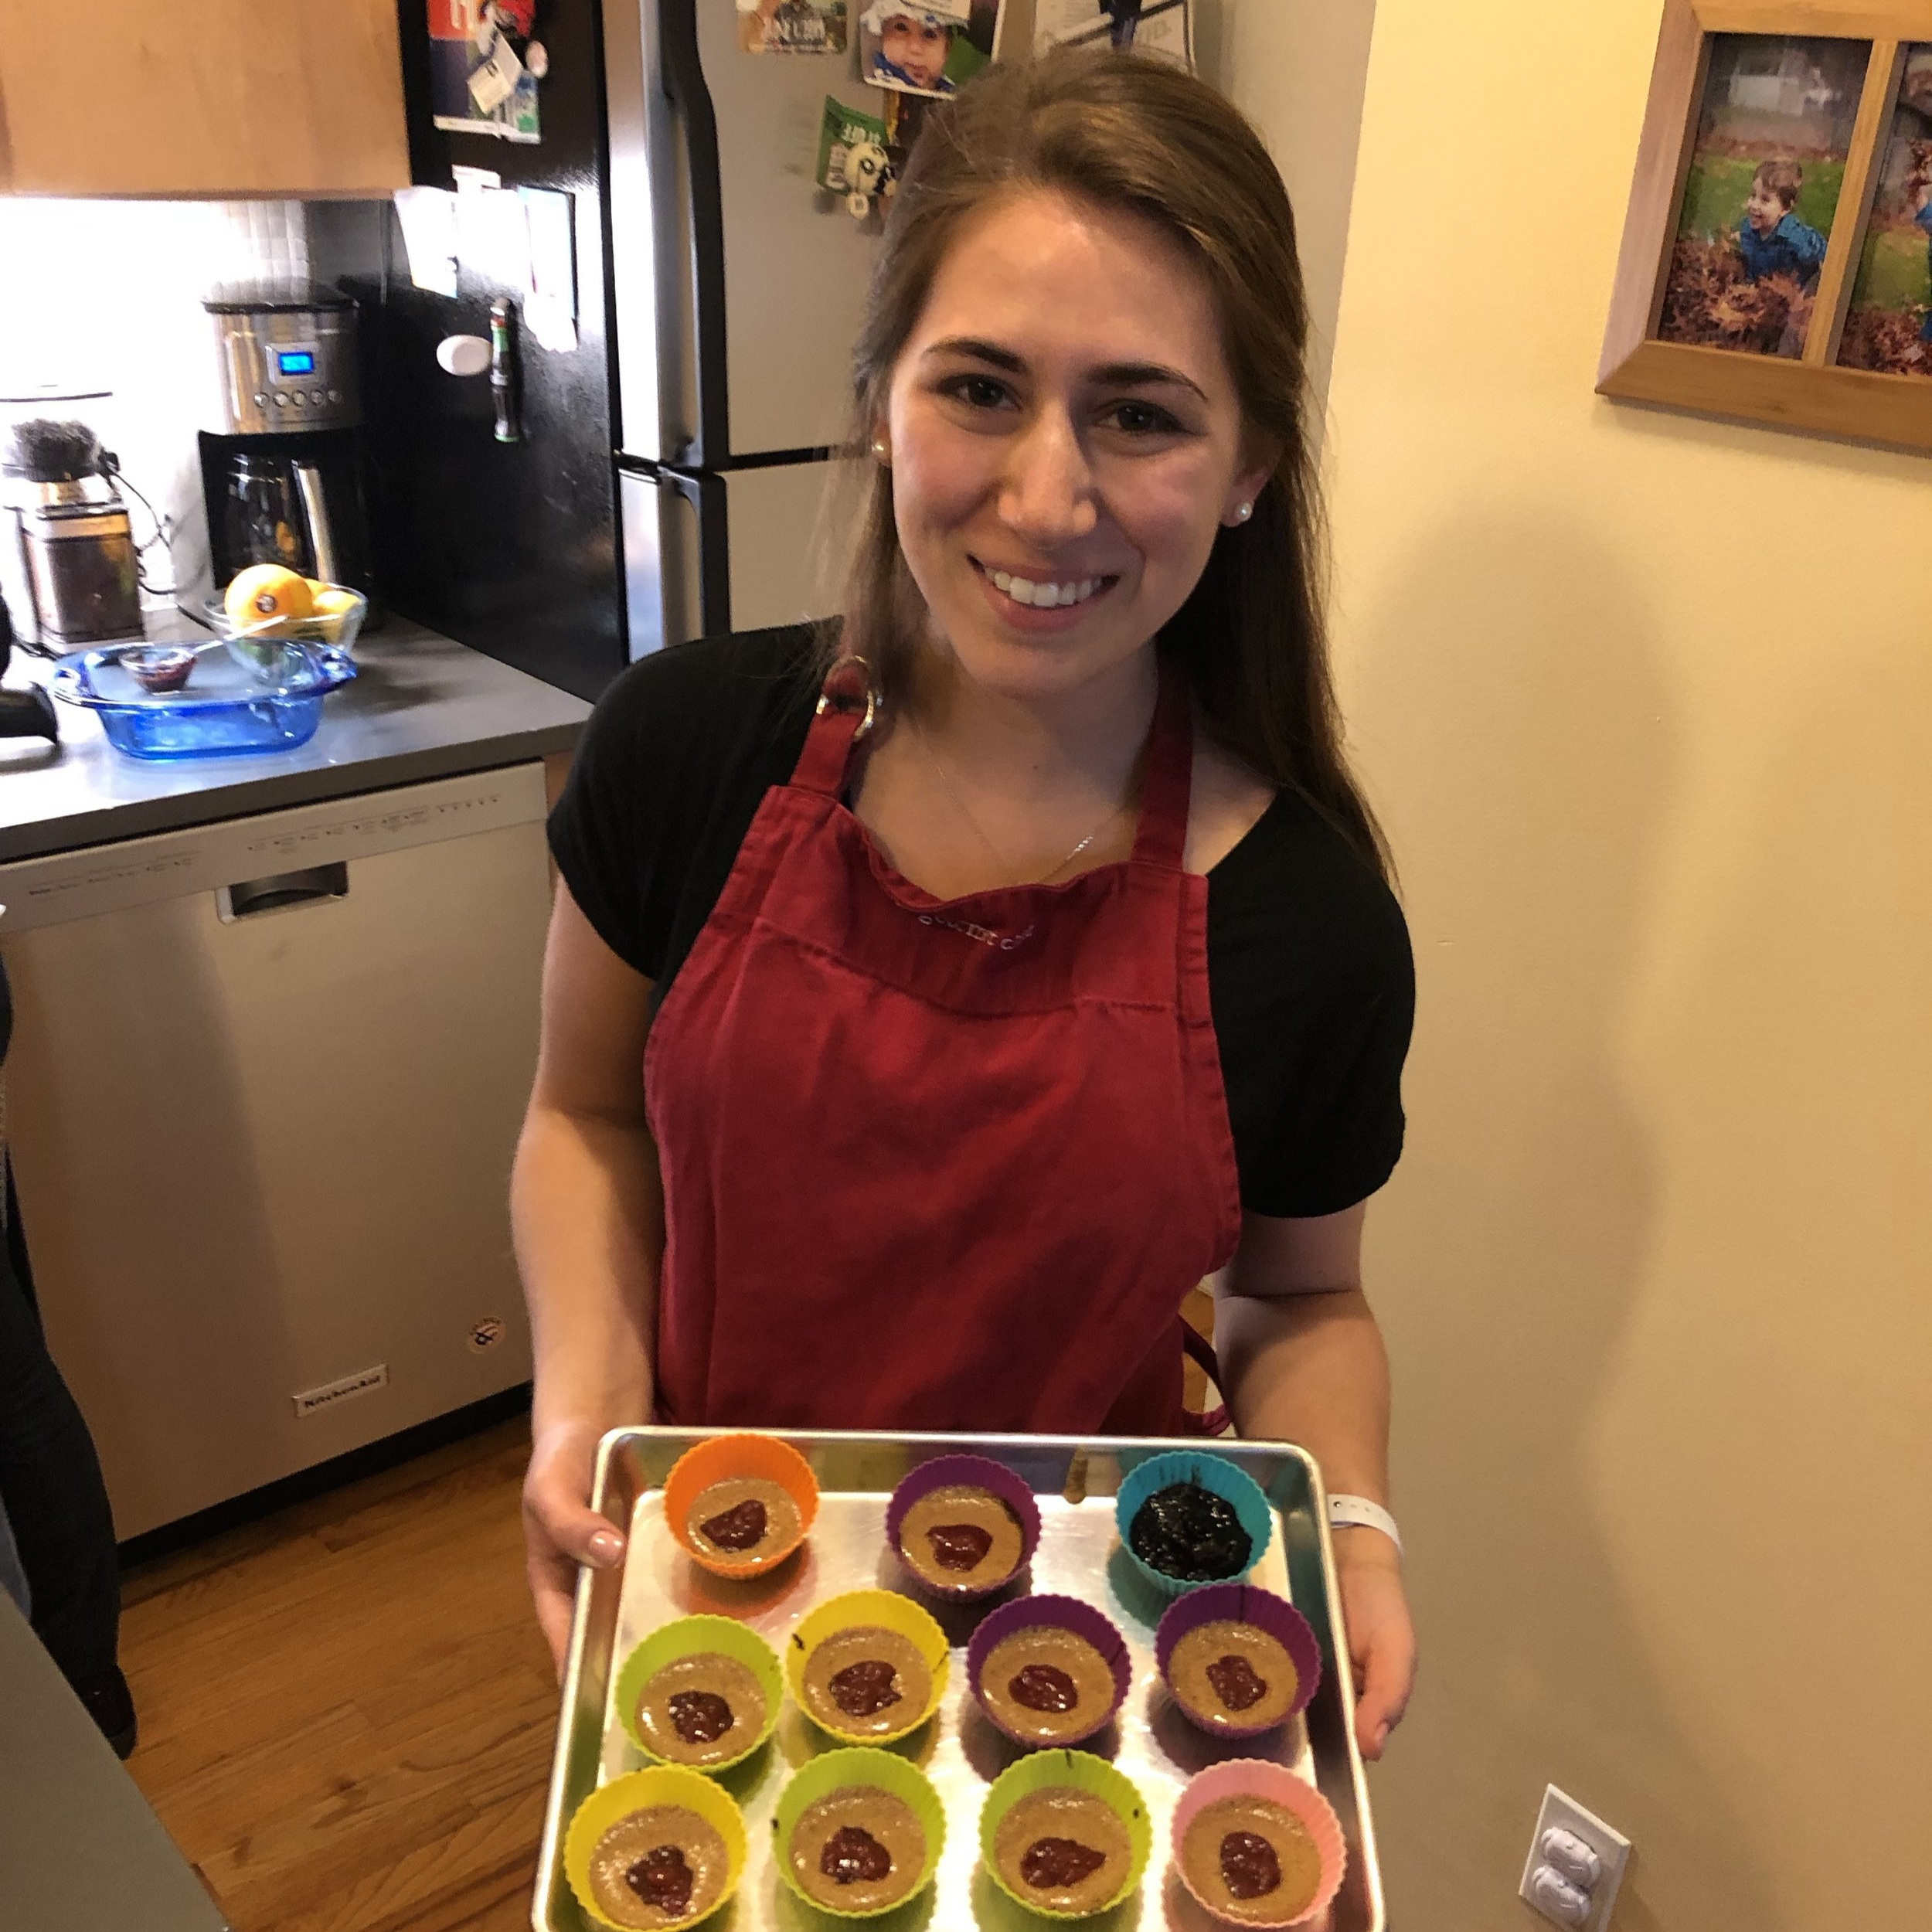
  7. Dollop ½ - 1 teaspoon of jam into the center of each cup.

  8. Freeze for 20-30 minutes or until jam is firm.

  9. Top the cup with another 2-3 teaspoons melted chocolate (Reheat it over the double boiler first if it firmed up). Spread chocolate evenly across the tops of the cups. Freeze for 30 minutes before enjoying.

To Freeze:

After the cups have completely hardened, remove from their liners and transfer to a freezer safe bag or container. Store up to 6 months. But they will not last this long.

To Defrost:

Remove from freezer and allow to sit at room temperature for about 10 minutes before serving. Promptly return any uneaten portions to the freezer.

QkTDNOpWQqWKjeit4O4YjQ.jpg

*Note about biscuits:

My favorite biscuits to use for these cups are the European graham cookies typically turned into speculoos. Biscoff works particularly well, but you can make these cups equally delicious with any sweetmeal or wholegrain biscuits that come in a cellophane tube (shown on the right), as well as gluten free graham cookies.

Spiced Sweet Potato Custard

Spiced Sweet Potato Custard

fullsizeoutput_472d.jpeg

Make this custard merely because it is downright delicious — creamy, decadent, with a hint of spice and subtle sweetness, but if you should need to know, it is also gluten-free, grain-free, dairy-free and can be made without processed sugar. We use leftover mashed or baked sweet potatoes to whip up this one-bowl wonder. Your food processor or immersion blender combines everything to the perfect consistency in just a few minutes. All you have to do is wait (and fight off the aroma of maple and spices) while it sets to satin flawlessness in the oven. You can also adjust the level of sweetness — reduce the maple crystals and serve with additional maple syrup on top. We sometimes swap the sweet potato for cooked pumpkin or winter squash flesh. We eat this for breakfast, brunch or dessert (and 2-year-old Andy consumed multiple servings as a meal for weeks on end).

Some tips on making this dairy free custard:

  • Whip everything up in a food processor, blender or with an immersion blender. Since there is no gluten, it’s hard to overdo it. The blending will simply make it all smoother. But if you create a lot of bubbles in the process, tap those out once you fill your ramekins.

  • A water bath or bain marie is a good idea if not a necessity (and not a particularly difficult one) for cooking custard to satiny smoothness. Don’t skip this. Before starting, simply find a baking dish large enough to hold your ramekins with space for some hot water in between. But don’t add the hot water until you've put your baking dish with filled ramekins into the oven and handle carefully to prevent water from spilling into the custard.

  • Maple crystals are the result of boiling all of the water off of the sap harvested from maple trees. Maple crystals, also known as maple sugar, are becoming increasingly easier to find wherever you buy pure maple syrup. If you can’t find maple crystals, turbinado and coconut sugar are your next best options in this recipe.

  • Freshly grate your nutmeg — it makes all the difference.

Whole nutmeg grated on a microplane

Whole nutmeg grated on a microplane

Maple sugar or maple crystals

Maple sugar or maple crystals

What you need:

  • ¼ cup plus 1 teaspoon coconut oil, melted

  • 1 ½ - 1 ⅔ cups cooked sweet potato flesh (peeled, skin discarded)

  • 1 teaspoon ground cinnamon

  • ¾ teaspoon freshly grated nutmeg

  • ½ teaspoon ground cardamom

  • ½ teaspoon ground ginger

  • ¼ teaspoon ground cloves

  • pinch of sea salt

  • ¼ cup maple crystals (or turbinado or coconut sugar)

  • ¼ cup maple syrup

  • 6 eggs

  • 1 cup full fat coconut milk

  • 2 tablespoons tapioca starch/tapioca flour

The custard is set when it no longer jiggles, except for a circle the size of a pinky fingertip in the middle.

The custard is set when it no longer jiggles, except for a circle the size of a pinky fingertip in the middle.

Optional: With a knife, loosen edges of custard and invert ramekin onto a plate. Serve with additional maple syrup and a dusting of freshly grated nutmeg.

Optional: With a knife, loosen edges of custard and invert ramekin onto a plate. Serve with additional maple syrup and a dusting of freshly grated nutmeg.

What you do:

  1. Preheat oven to 350 degrees. Brush 8-10 ramekins with coconut oil and place in a large baking dish with high sides.

  2. In a food processor or with an immersion blender in a medium bowl, purée sweet potato flesh with cinnamon, nutmeg, cardamom, ginger, cloves and sea salt until smooth. Stop and scrape down sides.

  3. Add maple crystals, maple syrup, and remaining melted coconut oil. Purée until smooth. Stop and scrape down sides. Add eggs and process until creamy, about 2 minutes.

  4. Add coconut milk and tapioca starch and process until smooth.

  5. Pour into prepared ramekins. Carefully transfer to oven rack that is slightly pulled out. Pour hot water into the baking dish until it comes halfway to two-thirds up the sides of the ramekins. Carefully slide the baking dish and oven rack back into the oven. Bake 25-30 minutes until custard is set. A tiny pea-sized circle in center will jiggle just a little when done.

  6. Allow to cool in baking dish 5 minutes. Then remove ramekins from baking dish and allow to cool further.

  7. Serve warm or chilled with additional maple syrup or dusting of freshly ground nutmeg if desired.

To Freeze: You can freeze the unbaked custard mixture two ways: pour unbaked custard mixture into a freezer safe container or wrap filled ramekins tightly in plastic wrap. Freeze up to 3 months. Defrost in refrigerator about 3 hours and continue with procedure.

Alternatively, keep completely cooled baked custards in their ramekins and wrap tightly with plastic wrap. Freeze up to 3 months. Defrost in refrigerator about 3-4 hours and enjoy or allow to come to room temperature before enjoying.