#csaseries

Spiced Summer Squash and Apple Bread with Crunchy Cinnamon Topping

Spiced Summer Squash and Apple Bread with Crunchy Cinnamon Topping

When the yellow squash melts into the bread under cover of apple and spice, kids (and adults like me) don’t even realize they’re gobbling up the vegetable. This recipe combines the oddly matched produce of late September, as is to say, "hey, I know fall is right around the corner, but summer is not quite over yet." You don’t have to wait until October to spice this up like a decadent warming pumpkin loaf.

Rustic No Fuss Eggplant Arrabbiata

Arrabbiata is a spicy tomato sauce made with lots of garlic and chili peppers. Although it literally translates to “angry,” no one, unless perhaps Tom Brady, will be angry if you make this Rustic No Fuss Eggplant Arrabbiata for dinner tonight. This dish can be adjusted, with equally delicious results, to suit vegans, those who eat gluten free, and/or eaters who are allergic to eggs! Win-win-win.

fullsizeoutput_5106.jpeg

The spicy kick is not the only thing setting this apart from your average eggplant parmesan or eggplant rollatini. Those traditional configurations of eggplant, sauce and cheese are much more particular, and I dare say, unnecessary. Admittedly, I appreciate an impeccable eggplant parmesan. And my mother’s meticulously rolled eggplant rollatini, held together by toothpicks before being baked in the oven might just be the inspiration for this dish. But here’s why this Rustic No Fuss Eggplant Arrabbiata should replace all of that…well…fuss:

  1. No frying. No mess. No three step dredge resulting in a once-normal hand transformed into 5 breaded thumbs.

  2. It can be made gluten free — easily. See #1. Toasted breadcrumb topping is 100% optional.

  3. All plant. No egg. Since the eggplant is not breaded, we skip the egg dredge.

  4. Mix and match or even omit (gasp!) the cheese. Fresh Mozzarella is a classic in eggplant parmesan and ricotta makes for a luscious rollatini, but here you can use either, both, add parmesan or pecorino romano, or leave out the cheese entirely. And thus (see #3), this dish can be made vegan without any of those questionable imitation vegan “cheeses”.

  5. Any sized casserole or baking dish with high sides will work. This fuss free eggplant bake doesn’t require a perfect fit, normally forcing you to transfer the partially layered contents of your eggplant bake into another better fitting vessel, three times, creating a sink full of dishes before you’ve put anything in the oven.

  6. No rolling. No toothpicks. Sorry to take away your fun, mom.

  7. I’m sure there is a 7th reason and perhaps even an 8th, but I want to share this with you before eggplant season has passed.

Rustic No Fuss Eggplant Arrabbiata

Serves: 4-6

What You Need:

  • 2 medium eggplant

  • 1-2 teaspoons kosher salt, plus more to taste

  • 4-5 tablespoons extra virgin olive oil, divided

  • red pepper flakes (crushed red pepper), to taste

  • 1 cup ricotta cheese or 8 ounces fresh mozzarella, sliced or 3-4 tablespoons pecorino romano or combination

  • freshly ground black pepper, to taste

  • 1-2 cups Quick Spicy Tomato Basil Marinara or your favorite version

  • 1/2 cup bread crumbs (seasoned if you like), optional

What You Do:

  1. Preheat the oven to 400 degrees.

  2. If desired, peel the eggplant. (Note: I always leave the skin intact for color, flavor and nutrients but if you want your overall bite to have a more silky texture, peel the eggplant). Slice eggplant into 1/4 inch thick slabs (or rounds if that is your preference).

  3. Lay the eggplant slices out in a single layer on the cutting board or baking sheets. Sprinkle liberally with kosher salt. Flip and sprinkle salt on the other side. Allow to sit for at least 10 minutes so that the moisture sweats out of the eggplant.

  4. Using a clean kitchen towel, pat the eggplant dry. Flip and pat dry on the other side as well.

  5. Transfer to a baking sheet and drizzle with about 2 tablespoons of extra virgin olive oil. Flip and drizzle olive oil on the other side. Sprinkle with red pepper flakes, if desired. Bake at 400 degrees for about 30 minutes or until eggplant is golden brown and crisp around the edges, flipping the eggplant slices and rotating the pan halfway through.

  6. Meanwhile, in a small bowl, mix cheeses together with freshly ground black pepper.

  7. In a baking dish with high sides, ladle a few spoonfuls of sauce, arrange about 1/4 of your eggplant slices in a single layer over the sauce. Dollop 1/4 of your cheese mixture across the eggplant slices. Repeat until you have used all of your ingredients, finishing with a layer of sauce on top. Sprinkle about 1/4 teaspoon of red pepper flakes on top, if desired.

  8. Bake at 400 degrees for about 30 minutes or until cheese is bubbly and lightly browned around edges.

  9. Meanwhile, in a small skillet over medium high, heat 1 tablespoon of olive oil. Add the bread crumbs and sauté, stirring frequently until lightly browned, about 4 minutes.

  10. Remove eggplant from the oven, and top with the toasted breadcrumbs. Allow to cool 5 minutes before serving.

New England Corn Chowdah

I'm from New England. This IS how you say it and spell it.

Here’s a recipe for a New England classic made vegetarian and gluten free. Of course, you can still use bacon for the extra richness or add lobster for a decadent summertime delight. See variations below. A traditional chowder might use a roux -- equal parts butter and flour cooked to a paste -- for thickening, but I’ve found that a purée of fresh corn kernels plus potatoes cooked down into the broth create the exact same result and help the chowder maintain it’s fresh light consistency rather than becoming gelatinous. Note: this chowder will also work well with leftover previously cooked corn on the cob. Just remove kernels from cobs and use both as if they were fresh. You might not extract as much flavor from the previously cooked cobs and the kernels won’t be as crunchy in the chowder but it’s certainly a great use for leftover corn on the cob.

What you need:

  • 5 ears of corn

  • 1 bay leaf

  • 3 teaspoons sea salt, divided

  • 2 tablespoons olive oil or unsalted butter, plus more butter for serving if desired

  • 1 onion, medium dice

  • 4-5 medium red potatoes, small dice

  • ¼ teaspoon dried thyme (optional)

  • pinch cayenne pepper (optional)

  • 3 cups half-n-half, whole milk or combination

  • ¼ cup fresh thyme leaves (from about 6-7 sprigs)

  • 1 teaspoon minced parsley leaves

  • black pepper to taste

What you do:

1. Cut corn kernels from cobs. Using the back of your knife, scrape the remaining kernels and juices from the cob. Set aside.

2. Boil 3 cups water with 2 teaspoons sea salt and add cobs (with kernels removed) and bay leaf. Simmer for 10 minutes. Drain and reserve liquid. Discard the cobs and bay leaf.

3. In a soup pot, heat the olive oil on medium high heat until it shimmers. Add diced onion and a pinch of salt and sauté until soft, about 3 minutes.

4. Add potatoes, another pinch of salt, dried thyme, and cayenne if using, and reduce heat to medium. Cook for about 5 minutes or while you prepare the liquid.

Blend about 1/3 of the fresh corn kernels with stock (or water) before adding to chowder to create a sweet and creamy base. (see step 5)[yup, my dad's jar of corks in the background]

Blend about 1/3 of the fresh corn kernels with stock (or water) before adding to chowder to create a sweet and creamy base. (see step 5)

[yup, my dad's jar of corks in the background]

5. Put about a cup of the reserved corn stock and 1 cup of the corn kernels into a blender. Blend until smooth. Alternatively, you could just add the corn kernels to the liquid in a large measuring cup and purée with an immersion blender. Add this liquid to the pot and simmer for about 20 minutes or until potatoes are very tender. Season to taste with salt and black pepper.

6. Add remaining corn kernels and cook for about 4 minutes.

7. Add milk and thyme, and warm until liquid just begins to steam. Be careful not to boil the milk. Season to taste with salt and pepper. Serve with an additional pat of butter, if desired, and minced parsley leaves.

IMG_9868.JPG

Variations:

With Bacon: At step 3, render the bacon until crispy in the soup pot. Remove bacon strips and lay on paper towels. Drain excess grease so that you are left with about 2 tablespoons in bottom of pan. Sauté diced onion in the 2 tablespoons of bacon fat and continue with recipe. Add roughly chopped bacon bits to the chowder just before serving.

With Lobster: At step 7, add previously cooked and shelled lobster meat, cut into bite sized pieces, with the milk and thyme.

To freeze: After adding the corn in step 6, remove from heat and allow to cool. Freeze the partially finished chowder at this point. To reheat and finish, simply defrost in the fridge or in a pot over low heat. Bring to a simmer and ensure potatoes are heated through. Add milk and thyme and continue with step 7.

Scallion Surplus Solutions

Why am I writing about scallions? It's not merely to highlight my alliteration abilities. I was recently reflecting on the fact that many of my spring recipes include a sauce that purees scallions beyond recognition. Each spring, I find myself with a surplus of scallions. Not one to gobble raw onions of any variety, these beautiful green alliums pile up in my fridge. Before they can wilt however, I whip them into a marinade or sauce. Some marinades get put to use immediately and others are stored in my freezer, with or without protein for a quick fall or winter meal.

Here are seven solutions for your scallion surplus followed by my recipe for Spring Jerk Marinade to be used in Jerk Lamb Shepherd's Pie (featured below) or to marinate some chicken wings or tofu steaks. All other recipes will be featured on the blog eventually or write and I'll send you the no-frills version pronto.

  1. Korean Beef Marinade

  2. Shrimp Scampi

  3. Scallion Pancakes

  4. Scallion Tart or Pizza

  5. Salsa

  6. Cheese and Scallion Biscuits

  7. When all else fails, add them to a crudité platter for dipping or drizzle with olive oil and grill.

Now on to the piece de resistance. I can't get enough of this jerk marinade and once you try it, you'll be making it in big batches again and again as well. This spring jerk marinade came about because two of the earliest plants available to me in the northeast are thyme (which often survives the winter and regrows on its own) and scallions. Add some ginger, garlic, spices, and of course habañero chili peppers into the food processor and you are good to go.

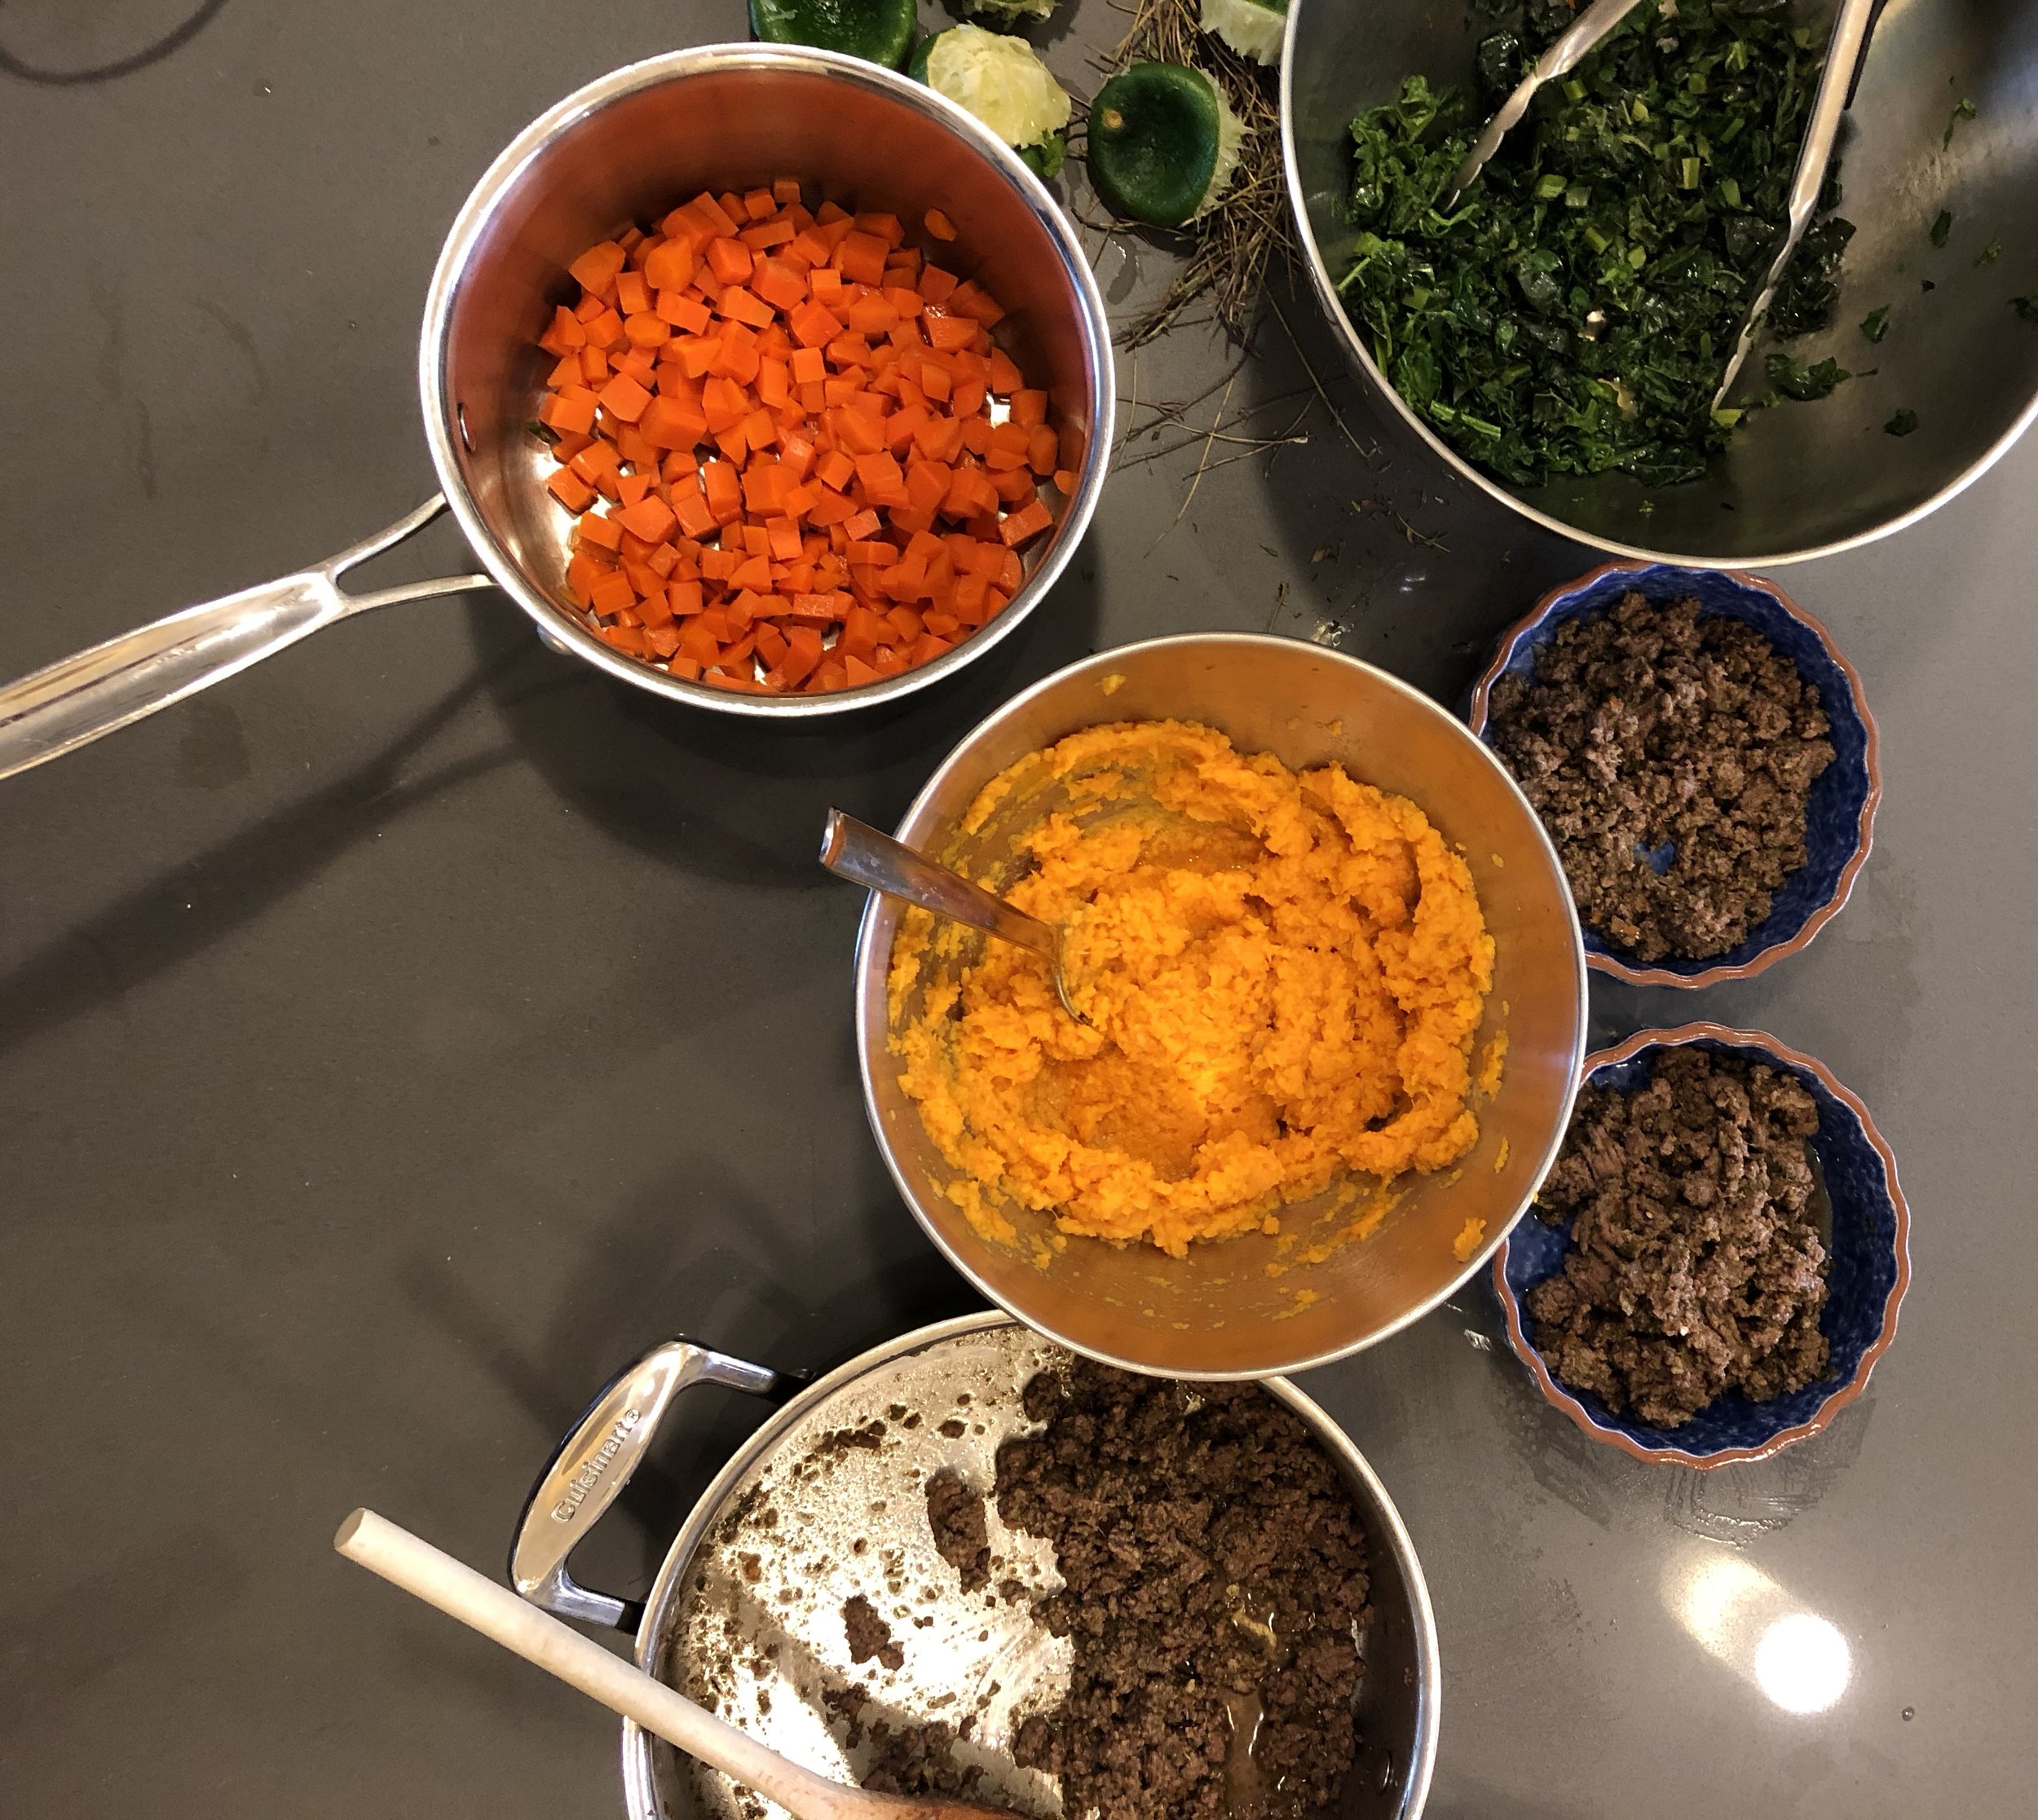
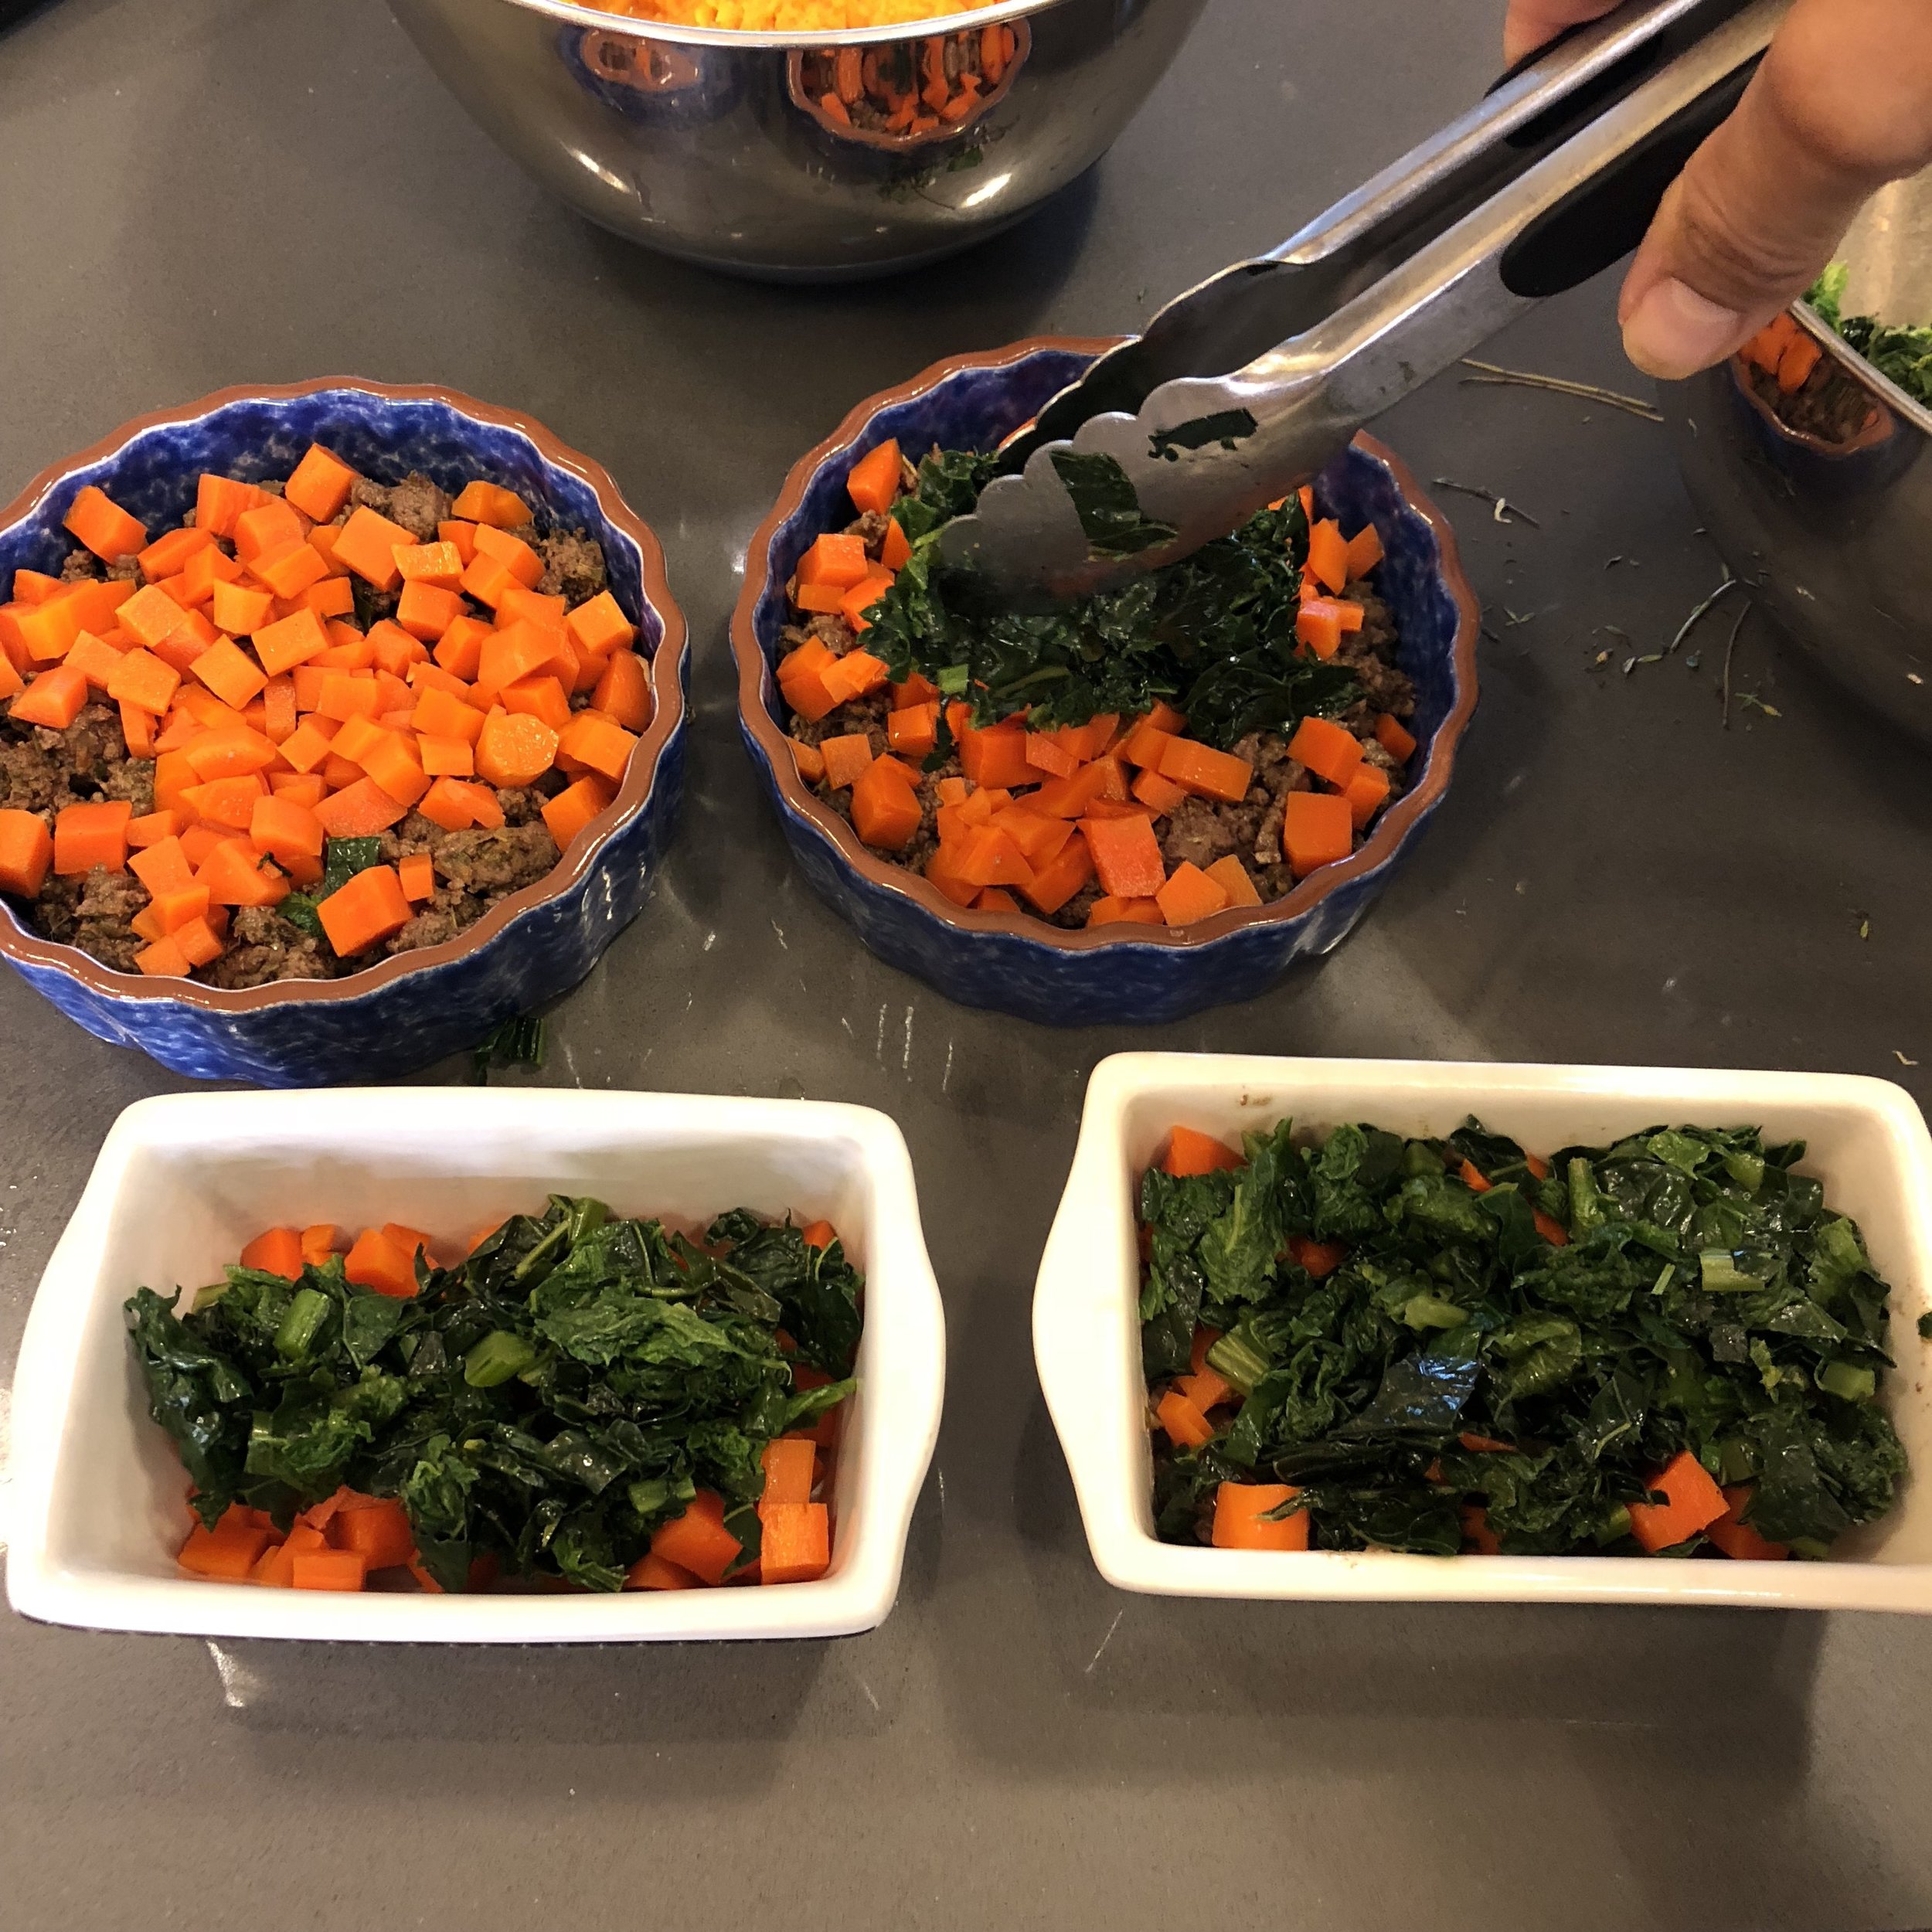
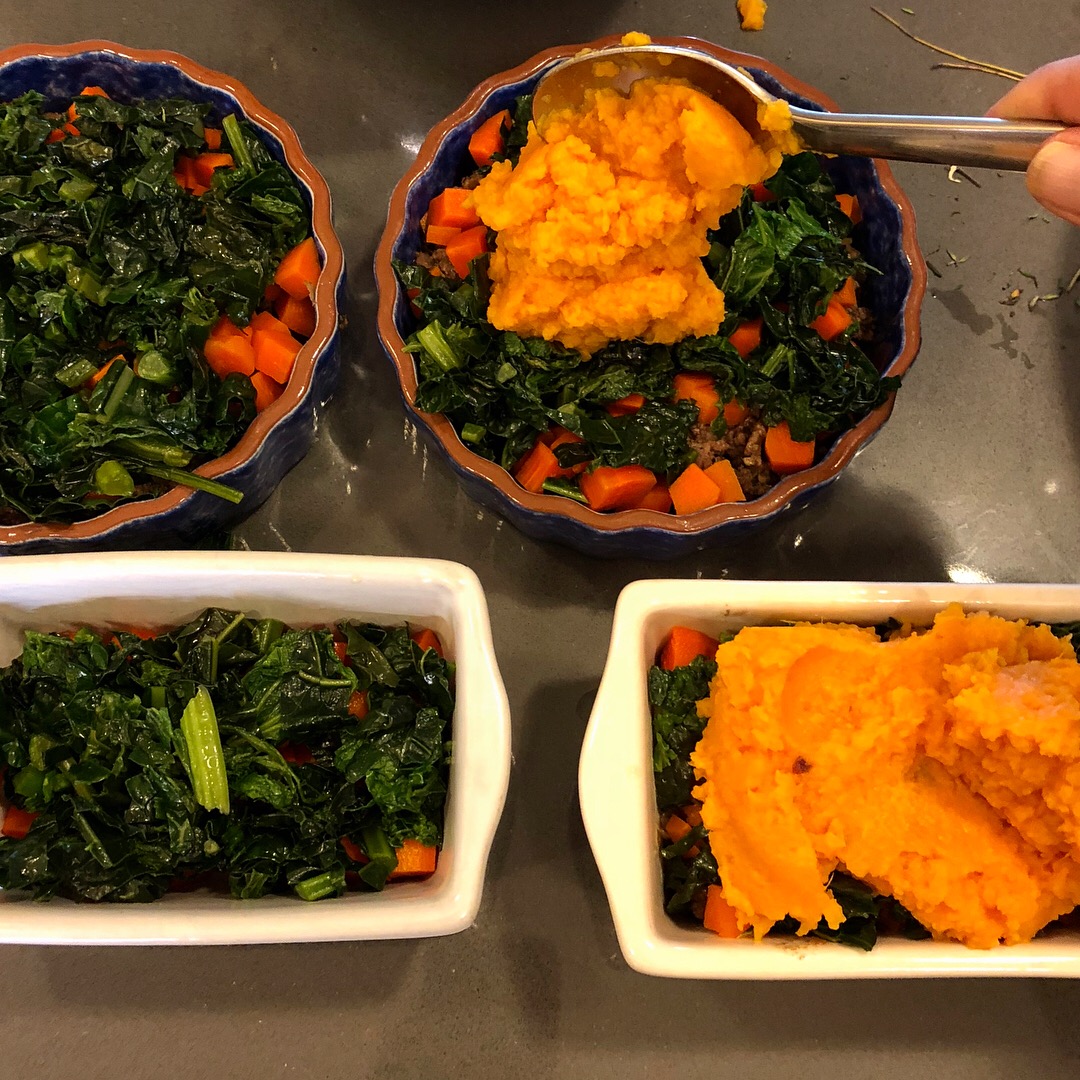
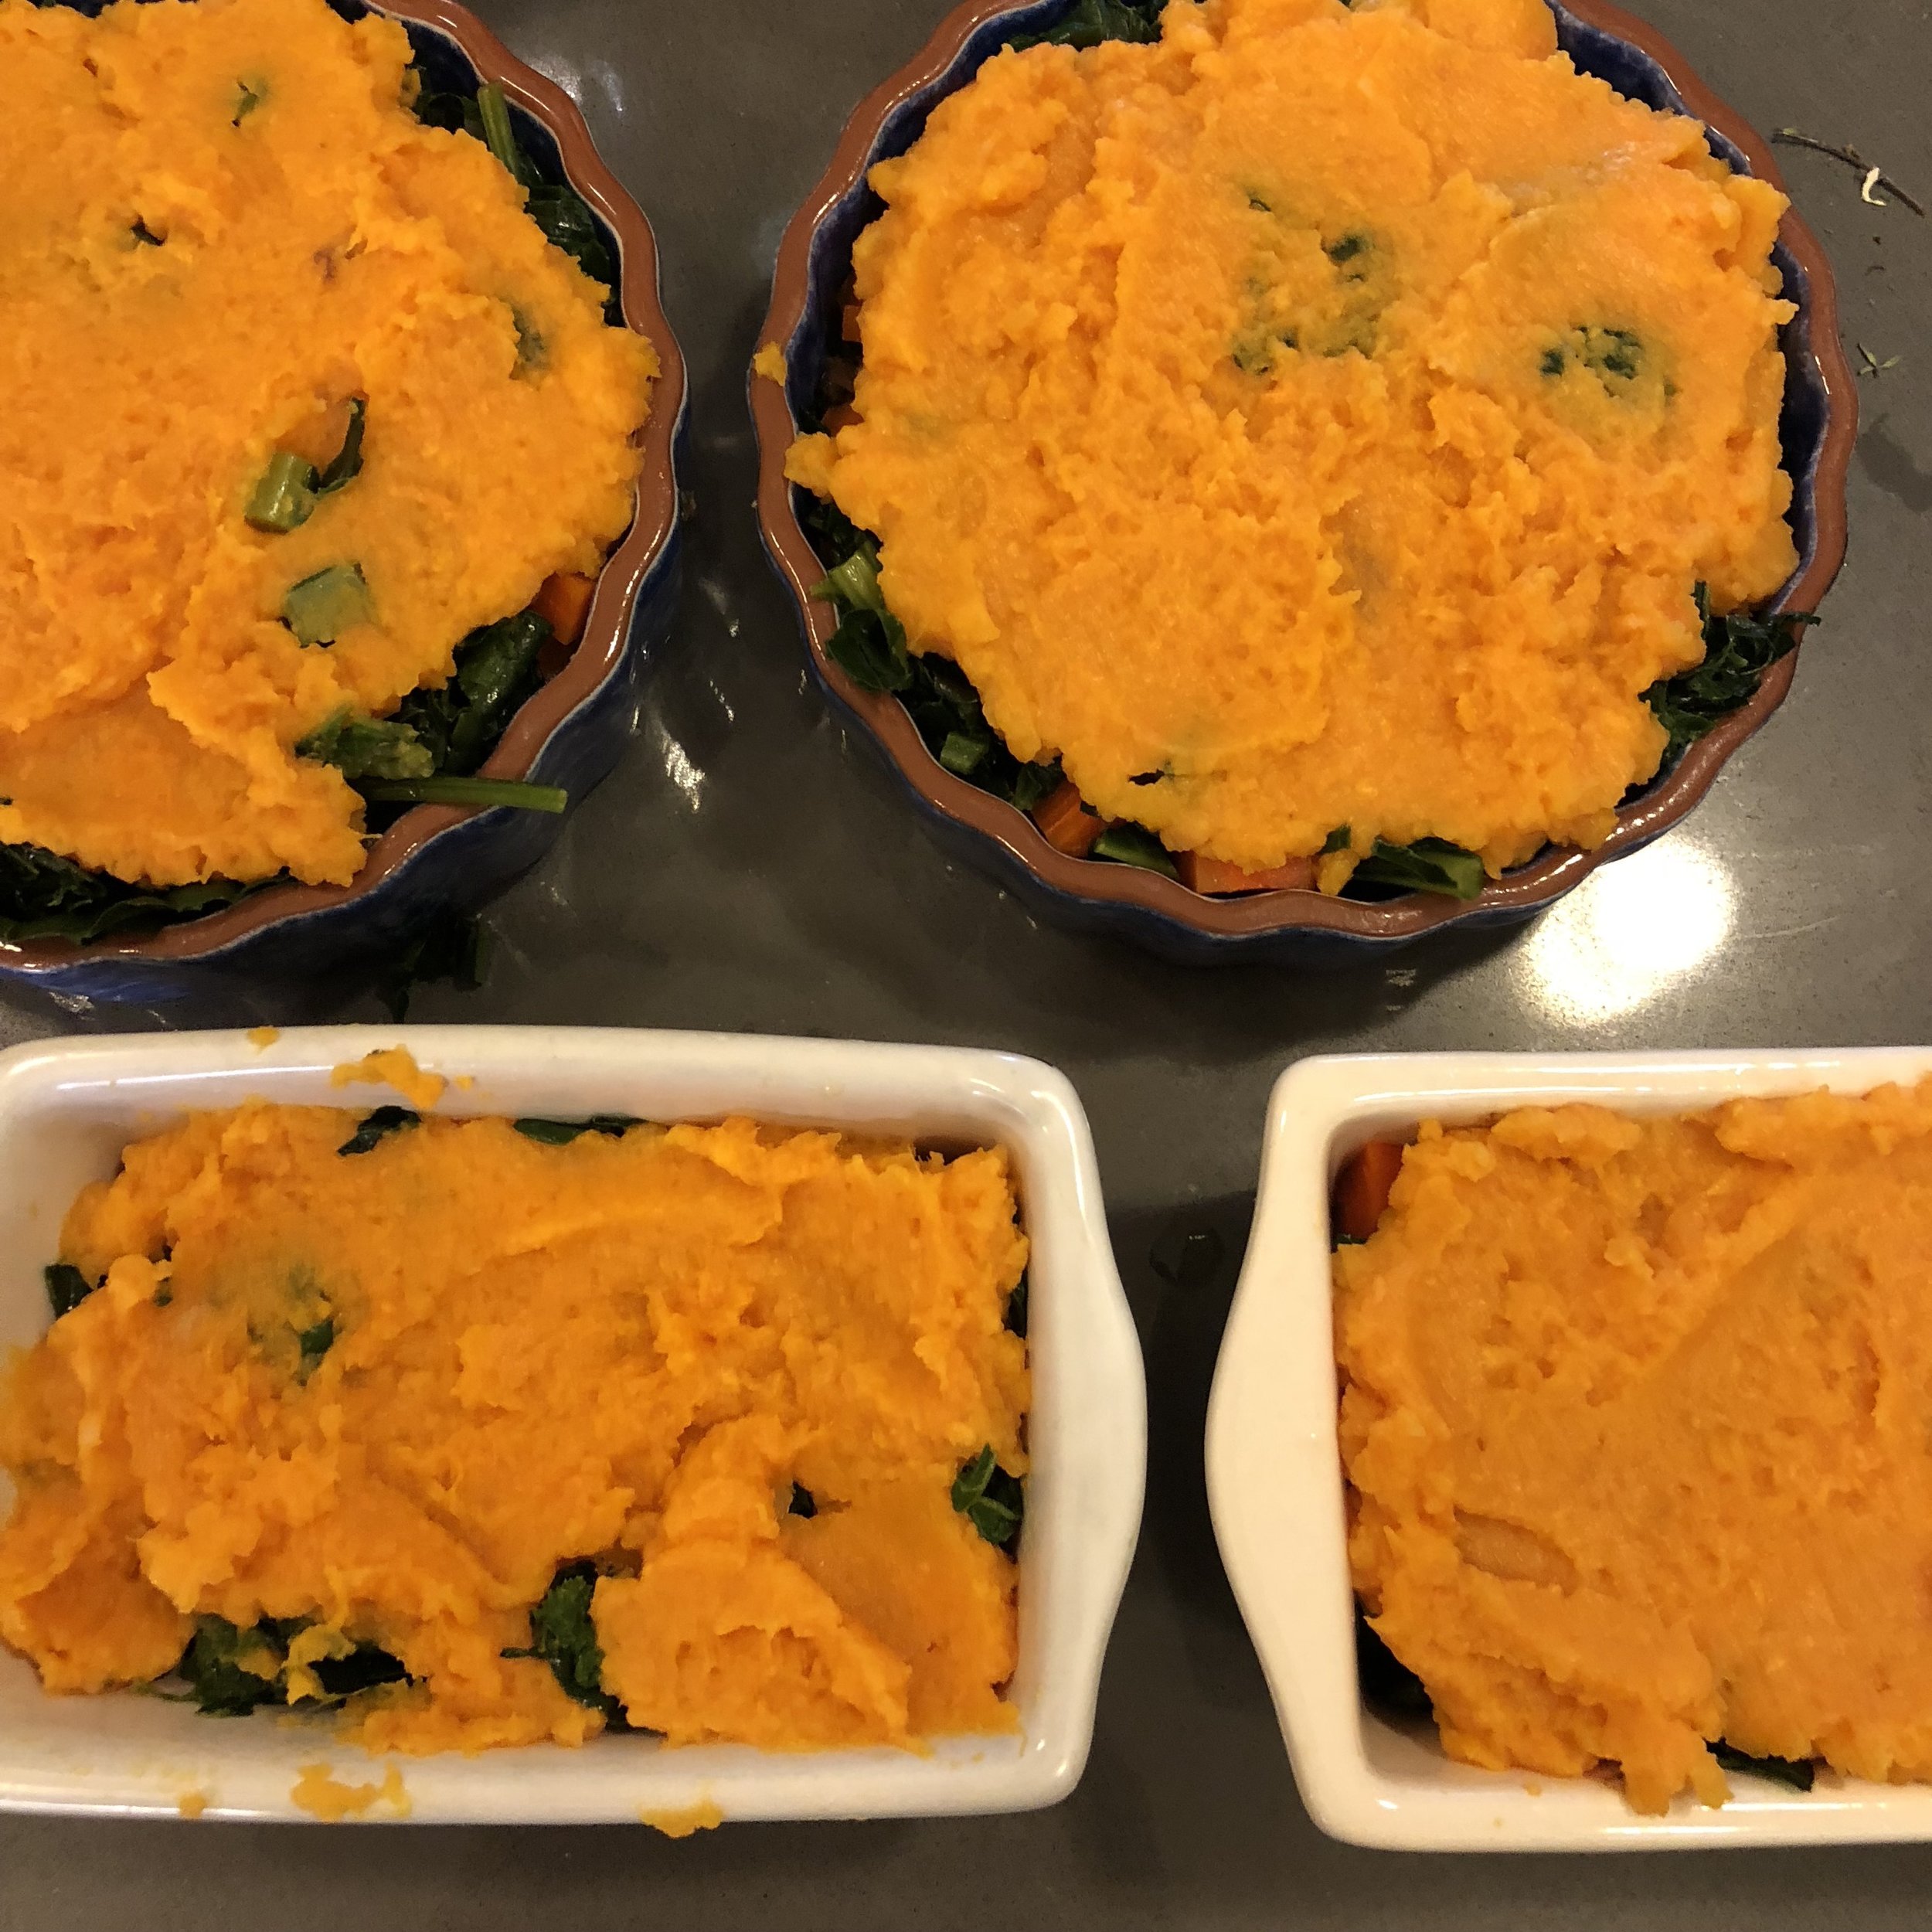
My jerk marinade has countless uses -- the expected chicken wings, marinating grilled vegetables and tofu, but my most unexpected and new favorite discovery has become Jerk Shepherd’s Pie. This creation was born out of a freezer clean out where I discovered some sautéed mixed greens, about a cup of jerk marinade and a 1lb package of ground beef. The resulting creation screams British pub food meets Caribbean beach BBQ. I since replaced the beef with ground lamb and have interchanged sweet potatoes for the red potatoes & yukon golds. If you use sweet potatoes or yams, I recommend baking those whole to soften them before mashing as boiling or steaming will add too much moisture.

Spring Jerk Marinade

Yield: ~ 4 ½ cups marinade

Teaching-Table-0750-1.jpg

What you need:

  • 2 shallots or small spring onions, about ½ cup large dice

  • 20 garlic cloves

  • 1 bunch scallions, top ⅓ of green removed, roughly chopped

  • 4 inch piece fresh ginger, peeled & roughly chopped, about ¼ cup

  • ½ cup brown sugar

  • ½ cup canola oil

  • 6 tablespoons tamari soy sauce or shoyu

  • ½ cup lime juice, approximately 4 limes

  • 2 bunches (1 ½ ounces) fresh thyme, leaves and tender stems only, approximately ½ cup

  • 4-8 habanero peppers

  • 5 tablespoons ground allspice

  • 2 teaspoons cinnamon

  • 1 teaspoon freshly ground pepper

  • 1 tablespoon kosher salt

  • ¼ cup water

Laura_Chef_Photos_July2017 (45 of 55).jpg

What you do:

  1. Put all ingredients, except the water, into the bowl of a food processor or blender. Process on high until completely pureed.

  2. Add water 1 tablespoon at a time, until it is the consistency of a runny sauce.

  3. Taste and adjust seasoning as needed. Be judicious with the chili peppers. The heat level will intensify over time.


Jerk Lamb Shepherd’s Pie

Yield: Serves 6

IMG_6337.JPG

What you need:

  • 3 red or yukon gold potatoes, about 1 ½ cups cut into ½ inch cubes

  • Kosher salt

  • 2 tablespoons butter (optional)

  • 3 medium carrots, small dice

  • 1 - 2 tablespoons olive oil or canola oil

  • 1 bunch cooking greens, chopped (such as mizuna, chard, kale, mustard greens)

  • 1 lb ground lamb (or beef)

  • 1 - 1 ½ cups jerk marinade (above)

What you do:

  1. Place the cubed potatoes in a large stock pot and cover with cool water. Add a generous handful of kosher salt. Bring to a boil, lower heat to medium and cook until potatoes are fork tender. Drain. Using a ricer or potato masher, mash the potatoes, adding butter if desired.

  2. In a medium pot fitted with a steamer basket, add water to just above the basket. Bring to a boil. Add the carrots and a few pinches of kosher salt. Steam until the carrots are tender but still firm, about 5 minutes.

  3. In a large skillet, heat oil on medium high heat. Add the chopped greens and a pinch of salt and sauté until they are soft. Remove greens from pan and set aside.

  4. Using the same skillet, heat another tablespoon of oil. Add the ground lamb, breaking it up with a spoon until you have ½ inch crumbles. Season with salt and freshly ground pepper and sauté until cooked through.

  5. Add the jerk marinade to the lamb. Cook about 5-7 minutes until the marinade is absorbed into the lamb and the lamb breaks down further into smaller crumbles.

  6. Preheat the broiler. In an oven- proof casserole dish, layer the lamb, followed by carrots and greens and top with the mashed potatoes.

  7. Heat under the broiler on high for about 12 minutes or until the top is lightly browned and crisp.

To Freeze: Wrap casseroles tightly with plastic wrap. Label with contents and reheating instructions.

To Reheat: Thaw overnight or for at least 12 hours in refrigerator. Preheat broiler. Remove plastic wrap and broil under high for 12-15 minutes or until the top is lightly browned and crisp and the center is warmed.

Variations on Hummus

fullsizeoutput_a89.jpeg

Stop rolling up to the school potluck with a store-bought tub of ordinary hummus and some crunchy carbs for dipping. Hummus is simple to make from scratch. And it does not need to be boring. You can add spices, change up the acid and even hide some vegetables in it. Here's a straightforward formula followed by various modern spins, including a colorful roasted beet hummus you can spread on your kids' sandwiches. My sweet potato black bean variation below is exactly what your Superbowl party ordered. Bonus: these spreads make great baby food too, especially to pack a smooth high protein punch for a little peanut like mine who needs to pack on some pounds.

Basic Hummus Formula

Makes about 1½ cups

What you need:

  • 1-2 cloves of garlic

  • 1 1/2 - 2 cups cooked legumes (chickpeas, black beans, white beans, lentils, etc.)

  • 1-3 Tablespoons tahini

  • 1/4 cup oil (olive, canola, avocado, etc.)

  • 1-2 Tablespoons acid (lemon juice, lime juice, apple cider vinegar, etc.)

  • salt & pepper to taste

  • 1/2 - 1 cup cooked vegetables (optional)

  • 1-3 teaspoons ground toasted spices (optional)

What you do:

Simply put all ingredients (except the acid, spices and salt) into a food processor and purée until smooth. Taste and add acid, spices, and salt gradually to get desired texture and taste. You can always add more salt, acid and liquid but it is difficult to take it away or add more of all of the other ingredients if you go overboard on, say, the lemon juice and cayenne. If your spread is too thick, add more acid (lemon juice, vinegar, etc.) or plain old H2O if you want to thin it without altering the taste too much.

Note on beans: When using canned beans, I drain them and rinse off the liquid first to get rid of any extra salt or any taste imparted by the canning process. You can also easily cook your own beans. More on that in a future post.

Try these variations:

  • Add a roasted beet and toasted ground cumin, cinnamon and cloves. You could also follow my recipe for Roasted Beet Hummus.

  • Substitute a sweet potato for the beet and roast without foil. Use cumin, cayenne, dried ground chipotle and/or smoked paprika for the spices. Substitute black beans or stick with the chickpeas.

  • Instead of beet or sweet potato, use ½ cup of any cooked vegetable (skins removed, roasted, grilled, or steamed), such as broccoli, red bell peppers, carrots, or squash.

  • Add ½ cup of prepared pesto and decrease the olive oil to 2 tablespoons.

  • Use lime juice, apple cider vinegar, sherry vinegar or white wine vinegar in place of the lemon juice.

  • Add an entire head of garlic roasted in olive oil. Decrease the olive oil to 2 tablespoons. Use chickpeas or substitute navy or cannellini beans.

Possibilities for Fresh Pumpkin Puree

Possibilities for Fresh Pumpkin Puree

American supermarkets have it all wrong. Those aluminum pyramids of mashed orange pulp should be displayed in March, not November. Why, at the height of harvest, would I eat last year’s (at best) pumpkin packed into a can when I can eat this week’s pumpkin fresh from the oven? Furthermore, what else are we going to do with the pumpkins we bought at Halloween and had every intention of turning into jack-o-lanterns?